| Issue |
A&A
Volume 583, November 2015
Rosetta mission results pre-perihelion
|
|
|---|---|---|
| Article Number | A26 | |
| Number of page(s) | 28 | |
| Section | Planets and planetary systems | |
| DOI | https://doi.org/10.1051/0004-6361/201525723 | |
| Published online | 30 October 2015 | |
Online material
Basic description and morphology of the various regions that are described in the main text.
IDs for used images.
Appendix A: Additional figures
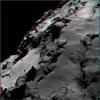 |
Fig. A.1
Anaglyph version of Fig. 5b in the main text. |
| Open with DEXTER | |
 |
Fig. A.2
WAC image showing the Seth region in addition to Ash and Babi. Arrows point to locations of the boundaries between adjacent regions. Also visible are a couple of circular pits (A and B). b) Cropped NAC image showing prominent features of the Seth region. The material is light toned, brittle and susceptible to fracturing and collapse creating darker toned talus-like deposits as well as boulders. c) Close up of b) showing the fractures that often form polygonal patterns (arrows). d) Cropped NAC image showing one of the most remarkable circular pits (A) on the surface of the comet as well as another pit (B), which together with pit A is part of a pit chain in the Seth region. |
| Open with DEXTER | |
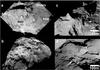 |
Fig. A.3
a) NAC image showing the Babi region and its surroundings. To view more accurate regional boundaries refer to other figures of the Appendix. b) Cropped WAC image showing an oblique view of the comet’s body centered at Babi. Note the dark-toned material (A), which corresponds to exposed cliff material and the ridge (B) that separates Babi from Aker. Similar ridges separate Babi from Seth and Ash. c) A crop of NAC image showing the diamond-shaped mesa that separates Babi from the Khepry region. Notice the presence of bright boulders in the foot of the mesa’s scarp (arrow). d) A crop of NAC image showing the layering in Babi in proximity to Aten’s depression. |
| Open with DEXTER | |
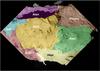 |
Fig. A.4
NAC image showing the regional boundaries and nomenclature superposed over Fig. 6a. |
| Open with DEXTER | |
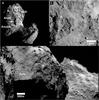 |
Fig. A.5
a) WAC image showing the side of the comet with Atum and Anubis regions on the body lobe. “A” marks the location of a complex depression that is highlighted in b) and c) as well. Boxes show the locations of Figs. A.7a and b while the white arrow shows the ridge separating Seth and Anubis, which is further highlighted in Fig. A.7c. b) NAC mosaic of two images showing an oblique view of the Atum region, its contact with Apis, and feature “A”. Note the rough and pitted texture, and limited number of boulders. An anaglyph version of this figure is available in Fig.A.6. c) Cropped NAC image showing part of the Atum region concentrating on feature “A”. |
| Open with DEXTER | |
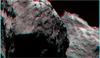 |
Fig. A.6
Anaglyph version of Fig. A.5b. |
| Open with DEXTER | |
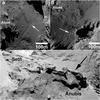 |
Fig. A.7
a) Crop of NAC image showing linear features in Anubis similar to Imhotep region. The Anubis region displays a considerable number of boulders, which may have originated from the Atum region. Note the smooth surface texture in comparison with the rough-textured enclosing regions of Atum and Seth. For context, refer to Fig. A.5a. b) Crop of NAC image showing possible folding in the Anubis deposits close to the boundary with Seth. c) Crop of NAC image showing the ridge separating Seth and Anubis. |
| Open with DEXTER | |
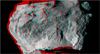 |
Fig. A.8
Anaglyph version of part of Fig. A.9a in the main text. |
| Open with DEXTER | |
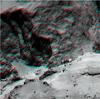 |
Fig. A.9
Anaglyph version of Fig. A.9b in the main text. |
| Open with DEXTER | |
|
Fig. A.10
a) WAC image showing a view of the comet with the head lobe in the foreground showing the light-toned Ma’at region. Note the morphological similarity with the Ash region on the body lobe. b) NAC image showing a significant part of the Ma’at region and its surroundings. Feature (H) corresponds to the Hatmehit region. The Ma’at region is generally smooth in texture and almost featureless except for the regions around the Hatmehit depression where the debris appears striated (inbox). c) Close-up of box in b) showing the ripple-like features in Ma’at that are common around the Hatmehit depression. The features appear to be aligned perpendicular to the depression’s rim. |
|
| Open with DEXTER | |
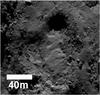 |
Fig. A.11
Flow-like feature and associated pit in the Maftet region. The pit is ~35 m-wide whereas the flow feature extends put for more ~75 m. |
| Open with DEXTER | |
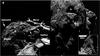 |
Fig. A.12
a) WAC image showing the Bastet region and its surroundings. The arrow points to the approximate location of Hatmehit behind the horizon. Note the unit’s darker tone with respect to Ma’at and Khepry. (A) and (B) point to alcoves showing evidence for mass wasting. The features are further highlighted in b). Arrows point to locations of the boundaries between adjacent regions b) NAC image showing the Bastet region in higher spatial resolution. The region is characterized by pervasive fracturing that is roughly oriented parallel to the plane of Hatmehit but occasionally displays cross-cutting relationships. Fractures appear to form polygonal patterns as well in some locations (see inbox). |
| Open with DEXTER | |
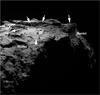 |
Fig. A.13
WAC image showing an oblique view of the Hatmehit depression and the regions surrounding it. Note the smooth morphology of the interior, the talus-like debris occupying parts of the depression on Bastet’s side and the curvilinear ridge (feature R) that appears to traverse through the central part of the depression. Arrows highlight the depression’s rim. |
| Open with DEXTER | |
© ESO, 2015
Current usage metrics show cumulative count of Article Views (full-text article views including HTML views, PDF and ePub downloads, according to the available data) and Abstracts Views on Vision4Press platform.
Data correspond to usage on the plateform after 2015. The current usage metrics is available 48-96 hours after online publication and is updated daily on week days.
Initial download of the metrics may take a while.