S. A. Matthews1 - L. van Driel-Gesztelyi 1,2,3,4 - H. S. Hudson5 - N. V. Nitta6
1 - Mullard Space Science Laboratory, University College London,
Holmbury St. Mary, Dorking, Surrey RH5 6NT, UK
2 -
Centre for Plasma Astrophysics, K.U. Leuven, Celestijnenlaan 200B, 3001
Leuven, Belgium
3 -
Observatoire de Paris, section Meudon, LESIA (CNRS), 92195 Meudon
Principal Cedex, France
4 -
Konkoly Observatory, Budapest, 1526, Hungary
5 -
Space Science Laboratory, UC Berkeley, CA 92740, USA
6 -
Lockheed Martin Solar and Astrophysics Laboratory, O/L9-41, B/252, 3251
Hanover Street, Palo Alto, CA 94304, USA
Received 16 June 2003 / Accepted 30 July 2003
Abstract
The aspect camera of the Soft X-ray Telescope (SXT) on Yohkoh
provided the first systematic survey of white-light flares from
an observatory in space.
The observations were made in the Fraunhofer g-band at a pixel
size of 2.46 arcsec and a typical sample interval on the order
of ten seconds.
A total of 28 flares with clear white-light signatures were
detected, corresponding to GOES events down to the C7.8 level
in one case.
Above the X-class threshold, all 5 events observed by SXT were
observed in white light, and the maximum average contrast observed
was 30% relative to the pre-flare continuum brightness of the flare location.
We have made comprehensive comparisons of Yohkoh soft X-ray
and hard X-ray data for this list of flares. In addition we compare
the properties of the WLF sample to a sample of 31 flares that showed
no white-light emission. These comparisons show that while white-light continuum emission
has a strong association with hard X-ray emission it is also strongly related to
coronal overpressure, as determined from the soft X-ray
spectrum, indicating a component with a thermal, rather than non-thermal origin.
Key words: Sun: flares - Sun: X-rays, gamma rays
In 1989 small aperture patrol telescopes (Neidig & Beckers 1983), observing in
the range
![]() Å, were reporting about 15 of these events a
year near solar maximum. They can be divided into two types according to their
spectral features (Machado et al. 1986). Type I events are usually the
brightest and show a Balmer jump at 3600 Å
Å, were reporting about 15 of these events a
year near solar maximum. They can be divided into two types according to their
spectral features (Machado et al. 1986). Type I events are usually the
brightest and show a Balmer jump at 3600 Å![]() and probably a
Paschen
discontinuity. The Balmer lines in this type of event are strong and very
broad, generally with strong central reversals. Type II events show
continuum enhancement with no Balmer jump and weak Balmer lines, with no lines
above H11 appearing. Emission in WLFs has been attributed to either hydrogen free-bound
transitions to the second and third levels, i.e. Balmer and Paschen continua,
or to H- emission processes (e.g. Svestka 1986). The first
of these
emission processes is linked with Type I events, the latter with Type II
emission. The emission process relates directly to the location of the WLF
source in the atmosphere, and, as a result, constrains the possible heating
mechanisms.
and probably a
Paschen
discontinuity. The Balmer lines in this type of event are strong and very
broad, generally with strong central reversals. Type II events show
continuum enhancement with no Balmer jump and weak Balmer lines, with no lines
above H11 appearing. Emission in WLFs has been attributed to either hydrogen free-bound
transitions to the second and third levels, i.e. Balmer and Paschen continua,
or to H- emission processes (e.g. Svestka 1986). The first
of these
emission processes is linked with Type I events, the latter with Type II
emission. The emission process relates directly to the location of the WLF
source in the atmosphere, and, as a result, constrains the possible heating
mechanisms.
It is widely believed that the energy release in solar flares occurs
in the corona and that energy is then transported to the low chromosphere where
the optical emission is produced. As a result of this view, and observations showing
good temporal correspondence between hard X-ray and white-light emission (e.g. Neidig
& Kane 1993), attempts to
explain the origin of the white-light emission have often concentrated on electron
energy deposition. Neidig (1989) considered heat conduction as a means of
transporting
the required energy. He found that assuming that the conductivity is the
classical value given by Spitzer (1962), and employing either the constant
density or
pressure assumptions of Shmeleva & Syrovatskii (1973) the
temperature
gradient required to sustain the required fluxes results in an emission
measure at
T < 105 K that is too small to radiate the observed flux, as
argued by Brown (1974).
According to the thick target model of
hard X-ray production (e.g. Brown 1971), the total power in a beam of
non-thermal electrons with energy ![]() keV is sufficient to power
the chromospheric WLF emission (Kane et al. 1986;
Canfield et al. 1986).
Electrons in this energy range are stopped at a depth in the atmosphere
corresponding to
keV is sufficient to power
the chromospheric WLF emission (Kane et al. 1986;
Canfield et al. 1986).
Electrons in this energy range are stopped at a depth in the atmosphere
corresponding to
![]() cm-3, appropriate for chromospheric
WLFs.
cm-3, appropriate for chromospheric
WLFs.
However, Hudson (1972) suggested that white-light emission in the chromosphere and temperature minimum region can be produced as a result of non-thermal ionization caused by electron collisions. In this scenario energetic electrons heat and ionize chromospheric plasma and the subsequent recombination will, if it is to the ground state, produce immediate re-ionization as a result of the high optical depth in the Lyman continuum. Consequently the plasma increases its continuum intensity in order to compensate for the non-thermal ionization level. In this case it is then unnecessary for the electron beam to penetrate to the lower chromosphere. Subsequent work by Aboudarham & Henoux (1987) and Metcalf et al. (1990) is consistent with this picture.
Neidig & Cliver (1983) compiled a catalogue of available WLF observations at
the time,
including their statistical properties and associations. Their sample included 57 flares
reported between 1859 (the famous event observed by Carrington and Hodgson) and 1982. On the
basis of their statistical examination they concluded that: WLFs are produced in large and
magnetically complex active regions; they exhibit a north-south asymmetry, with 70% of
flares occurring in the northern hemisphere, and the mean latitude is 18 ![]() 1
1![]() in
the north compared to 13
in
the north compared to 13 ![]() 2
2![]() in the south; they show no preferred longitude, and
median values of H
in the south; they show no preferred longitude, and
median values of H![]() importance, GOES class and
importance, GOES class and ![]() 8 GHz peak flux density are 2B,
8 GHz peak flux density are 2B,
![]() X3 and
X3 and ![]() 4000 sfu, respectively. The smallest values that they detected in
conjunction with
WLF emission were 1B, M5 and 100 sfu. In addition, they found a 60% association with
Type II bursts, 70% association with Type IV bursts, 79% association with Type III bursts
and 75% association with proton events, although
they argued that association with proton events was not evidence for a physical connection,
but rather, evidence for "Big Flare Syndrome'' in which all extensive parameters of
flares scale roughly proportionally (BFS, Kahler 1982).
4000 sfu, respectively. The smallest values that they detected in
conjunction with
WLF emission were 1B, M5 and 100 sfu. In addition, they found a 60% association with
Type II bursts, 70% association with Type IV bursts, 79% association with Type III bursts
and 75% association with proton events, although
they argued that association with proton events was not evidence for a physical connection,
but rather, evidence for "Big Flare Syndrome'' in which all extensive parameters of
flares scale roughly proportionally (BFS, Kahler 1982).
The Transition Region and Coronal Explorer (TRACE), launched in April 1998, also provides a capability for observing white-light flares from space, at much higher spatial resolution than Yohkoh, as described in Metcalf et al. (2003). In principal the Michelson Doppler Imager (MDI) on the Solar and Heliospheric Observatory (SOHO) also provides an opportunity to observe white-light flares and indeed has observed two flares also seen with TRACE (Gregory at al. 2001). Both of these datasets provide potentially rich new sources of information on white-light flares, particularly when combined with HXR data from the RHESSI (Reuven Ramaty High Energy Solar Spectroscopic Imager), that have yet to be fully exploited. However, since these are separate observing platforms the potential for overlapping observations at multiple wavelengths is somewhat lower than for the Yohkoh dataset.
The Yohkoh dataset provides us with a unique resource for enhancing our understanding of white-light flares. While time series data have been available in HXR and SXR to complement ground-based optical observations for many events, these data have rarely included spatial information and were often obtained by instruments on different platforms. Yohkoh offers us the first, and currently only, simultaneous imaging and time series data in white-light, soft X-rays and hard X-rays from a single platform in space.
There have been a number of previous studies done making use of the white-light data from Yohkoh (e.g. Hudson et al. 1992; van Driel-Gesztelyi et al. 1994; Matthews et al. 1998, 2000, 2002; Sylwester & Sylwester 2000). While the first three of these studies conclude that there is both good spatial and temporal coincidence between hard X-ray emission and WLF emission, the latter three suggest that this correlation is not always seen. In particular, Sylwester & Sylwester (2000) use a deconvolution routine which gives them an equivalent spatial resolution in SXR and optical images of less than 1 arcsec. Comparing the emission in the HXR and optical they find they are not co-spatial and thus probably related to different plasma volumes at any given time. Matthews et al. (2000, 2002) find a generally good spatial and temporal correlation between HXR and WLF emission during the impulsive phase, but note that the WLF emission frequently persists beyond this phase and occasionally shows a better correlation with the time profiles of more thermal emission.
Thus, despite a large body of previous work on these interesting events, there are still many remaining questions. Perhaps of particular interest are the reasons why, despite more sensitive detection techniques, we still observe WLF emission in only a sub-set of flares. In this regard the Yohkoh dataset is also unique in providing a counter dataset of flares, observed under the same conditions, that showed no white-light enhancement. Since in our sample we observe WLF emission from a C7.8 class flare we are reluctant to explain this away purely on the basis of "Big Flare Syndrome''. In this paper we present a catalogue of the Yohkoh WLFs and non-WLFs together with our initial statistical measures and analysis of their properties. In Sect. 2 we first outline the instrumentation that we have used for our observations. We then describe our data analysis techniques in Sect. 3, presenting three case studies in Sect. 4 and a discussion of various statistical and correlation studies in Sect. 5. Finally we discuss our results in Sect. 6. Images and light-curves of the remaining 25 WLFs can be found in the Appendices.
The aspect camera on the Yohkoh SXT comprises a doublet achromatic lens with 50 mm diameter and 1538.4 mm focal length (Tsuneta et al. 1991). The telescope was mounted on the optical axis of the X-ray telescope and made use of the same detector. The filter wheel contained two filters, one about 30 Å wide and centred at 4308 Å which includes the Fraunhofer g band, and the other about 140 Å wide centred at 4580 Å. Most of the observations were obtained in the 4308 Å narrow-band (NaBan) filter. In November 1992 the failure of an X-ray aperture filter caused the optical system to be blinded with scattered visible light from the X-ray optics. Also, the sensitivity suffered a continual loss over the telescope's operational lifetime, as can be seen in Fig. 2 of Hudson (1994). The degradation showed a quasi-exponential decay which led to gradually increasing exposure times as the mission went on.
During the period of operation of this camera (October 1991-November 1992) the 4308 Å filter was used for routine observations and the data presented in this catalogue were all taken with this filter. Despite the increase in exposure times during the mission these were still on the order of 1 s or less, on which time scale satellite jitter motions are generally small. However, other factors can affect the sensitivity of the white-light measurements in general, as indicated in Hudson et al. (1992). We are ultimately limited by photon counting statistics and Hudson et al. (1992) noted that the mean rms fluctuation in the difference images comes within a factor of two of this limit. Additional factors include fluctuations in solar brightness as the result of p-modes and granulation, large intensity gradients found in sunspots, and in addition noise introduced by pointing jitter if the data are not accurately registered from one frame to the next. Since we make use of time-wise cancellation - involving the subtraction of a non-flare image from the dataset - (e.g. Uchida & Hudson 1972) in order to identify white-light flares in our dataset, this frame by frame registration is particularly important in order to ensure that difference signals are truly white-light enhancements and not the result of artefacts introduced by mis-aligned data.
In Tables 1 and 2 we indicate the date, start time, location, GOES classification and H![]() classification (where available) of both the WLFs and non-WLFs. We list also the magnetic
classification of the active region as listed in Solar Geophysical Data (ed. H.E. Coffey), where
classification (where available) of both the WLFs and non-WLFs. We list also the magnetic
classification of the active region as listed in Solar Geophysical Data (ed. H.E. Coffey), where
![]() indicates a unipolar region;
indicates a unipolar region; ![]() is a bipolar group with a balance
between the preceding and following spots;
is a bipolar group with a balance
between the preceding and following spots;
![]() is a group in which the polarities
are completely mixed;
is a group in which the polarities
are completely mixed;
![]() is a bipolar group where the preceding spots dominate
and
is a bipolar group where the preceding spots dominate
and
![]() is a region with spots of opposite polarity within 2.5
is a region with spots of opposite polarity within 2.5![]() of one another
and in the same penumbra. Also listed for both groups are the active region corrected
area in millionths of a solar hemisphere and whether or not the flare was associated with a
radio Type II or Type III burst, as indicated in Solar Geophysical Data.
of one another
and in the same penumbra. Also listed for both groups are the active region corrected
area in millionths of a solar hemisphere and whether or not the flare was associated with a
radio Type II or Type III burst, as indicated in Solar Geophysical Data.
In addition, Table 1 provides extra information relevant only to the WLF sample, i.e. the number of WLF kernels observed during the flare, the percentage maximum contrast relative to the pre-flare continuum intensity over the 4308 Å band, and the location of the WLF kernels relative to the quiet photosphere and sunspot umbrae and penumbrae.
Table 1:
List of WLFs indicating start times, flare location, GOES class, H![]() classification,
number of WLF kernels observed, WLF kernel location within the flare site, maximum WLF contrast
relative to the pre-flare brightness in the flare location over the 4308 Å band, active region and sunspot class and
corrected area as defined by Solar Geophysical Data, and whether or not a corresponding Type II
or Type III radio burst was also observed in association with the event.
a - magnetic classification of the active region is as given in Solar Geophysical Data:
A=
classification,
number of WLF kernels observed, WLF kernel location within the flare site, maximum WLF contrast
relative to the pre-flare brightness in the flare location over the 4308 Å band, active region and sunspot class and
corrected area as defined by Solar Geophysical Data, and whether or not a corresponding Type II
or Type III radio burst was also observed in association with the event.
a - magnetic classification of the active region is as given in Solar Geophysical Data:
A= ![]() ,
unipolar region; B =
,
unipolar region; B =![]() ,
a bipolar group with a balance between the preceding and following spots; G =
,
a bipolar group with a balance between the preceding and following spots; G = ![]() ,
a group
in which polarities are completely mixed; BP =
,
a group
in which polarities are completely mixed; BP = ![]() ,
bipolar group where the preceding
spots dominate; D =
,
bipolar group where the preceding
spots dominate; D = ![]() ,
spots of opposite polarity within 2.5
,
spots of opposite polarity within 2.5![]() of one another and
in the same penumbra; b - in millionths of a solar hemisphere; c - boundary between the
penumbra and photosphere; d - boundary between the penumbra and umbra; e - for this event
we have no pre-flare image of the active region in NaBan data and the flare ended in a data gap so
that we were unable to determine a reliable value for the contrast in this case; f - the flare was at the
limb making location determination unreliable. g - for this
event we list two values of peak contrast based on two WLF kernels quite separate in time.
of one another and
in the same penumbra; b - in millionths of a solar hemisphere; c - boundary between the
penumbra and photosphere; d - boundary between the penumbra and umbra; e - for this event
we have no pre-flare image of the active region in NaBan data and the flare ended in a data gap so
that we were unable to determine a reliable value for the contrast in this case; f - the flare was at the
limb making location determination unreliable. g - for this
event we list two values of peak contrast based on two WLF kernels quite separate in time.
Table 2:
List of non-WLFs which form our comparison group, giving date,
start time, location, GOES class, H![]() classification, active region class and
corrected area from Solar Geophysical Data, and whether a Type II or Type III radio burst was
observed in association with this event. a - active region class is as defined in Table 1;
b - millionths of a solar hemisphere.
classification, active region class and
corrected area from Solar Geophysical Data, and whether a Type II or Type III radio burst was
observed in association with this event. a - active region class is as defined in Table 1;
b - millionths of a solar hemisphere.
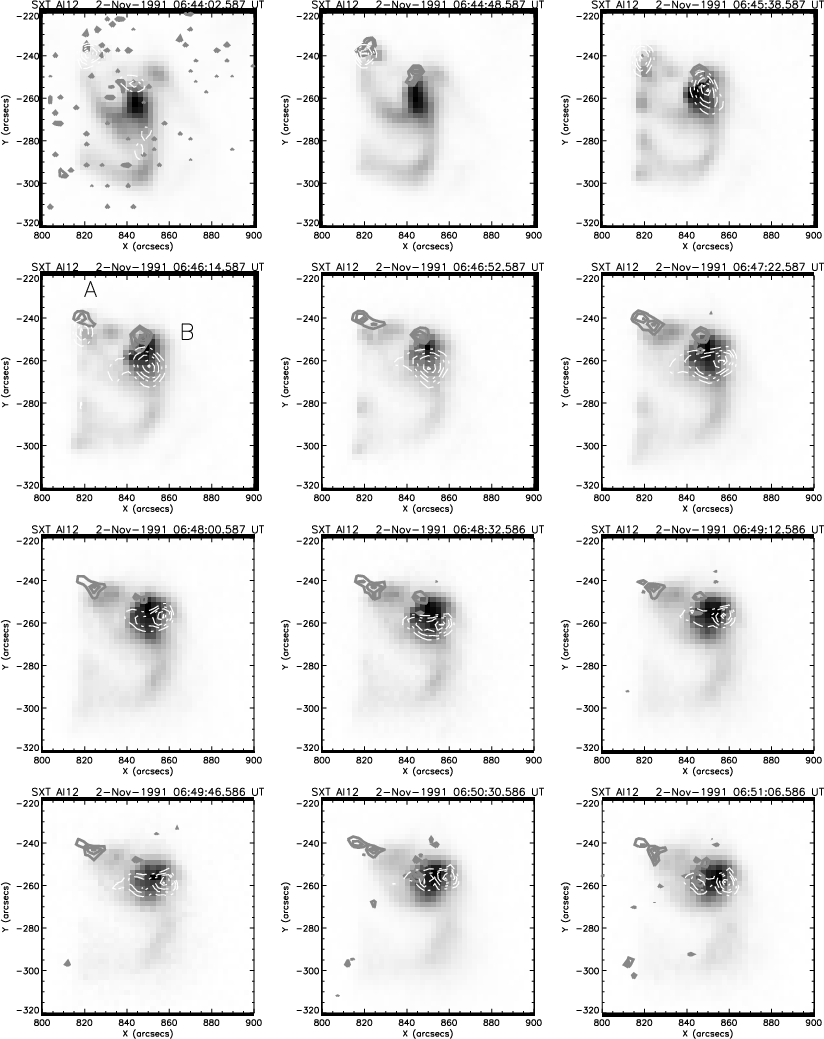 |
Figure 1: A series of images of the flare of 2 November 1991 in the Al12 filter of the SXT. Overlaid are contours of the WL emission (solid lines) and of the M1 channel (dashed white lines). There are two WLF kernels that correlate well spatially with the M1 sources, with a small offset. The larger of the two sources centred at (850, -260) is also the stronger of the two and the longest lived. The northern source seems to correspond to a footpoint. |
| Open with DEXTER | |
Much of our white-light data was so-called "low-8 data''. The original
12-bit data from the CCD camera are compressed to 8-bit before transfer to
the data processor and in order to maintain the accuracy of the full 12 bits
the compressed data plus low-order 8 bits for the same region are used to
reconstruct the full 12 bits. For X-ray images
the error that the compression introduces is less than the error introduced
by counting statistics. However, for optical images the reverse is true. For
this reason aspect camera data were usually taken in compressed and low-8 bit
modes separately and these data were then combined to restore the original
precision. Our first step with the white-light data therefore was to restore
the low-8 data. Having done this we then applied the standard instrumental
calibrations to the data using the routine sxt-prep. The alignment of
the data cubes was achieved via a combination of sxt-prep which corrects
for spacecraft jitter and roll offset, and correlation tracking. Since the alignment
accuracy of sxt-prep is good to only 0.5 pixels (M. Morrison, personal communication)
the correlation tracking was used in all cases to ensure good registration. Once we were
satisfied with the alignment of the data cube a non-flare image was
subtracted from the rest of the images to produce a white-light difference
cube. The image to be subtracted was ideally chosen to be from the pre-flare
active region. Where this was not possible, the image was the last in our
dataset, provided that there was no discernible flare emission at this time.
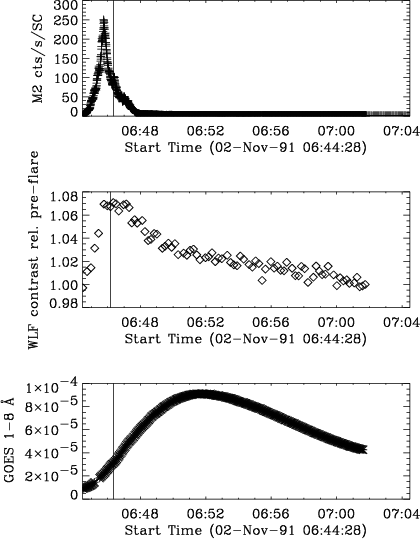 |
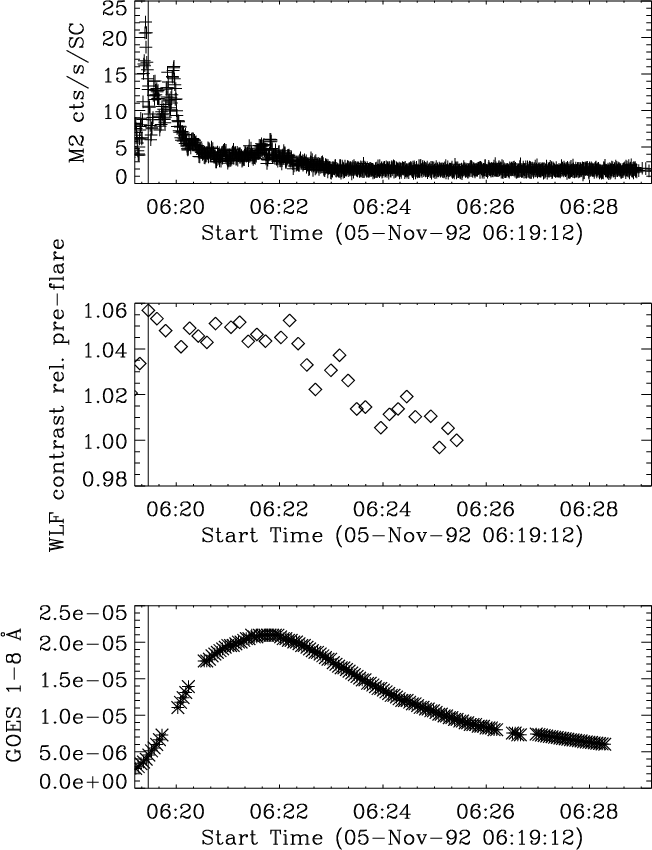
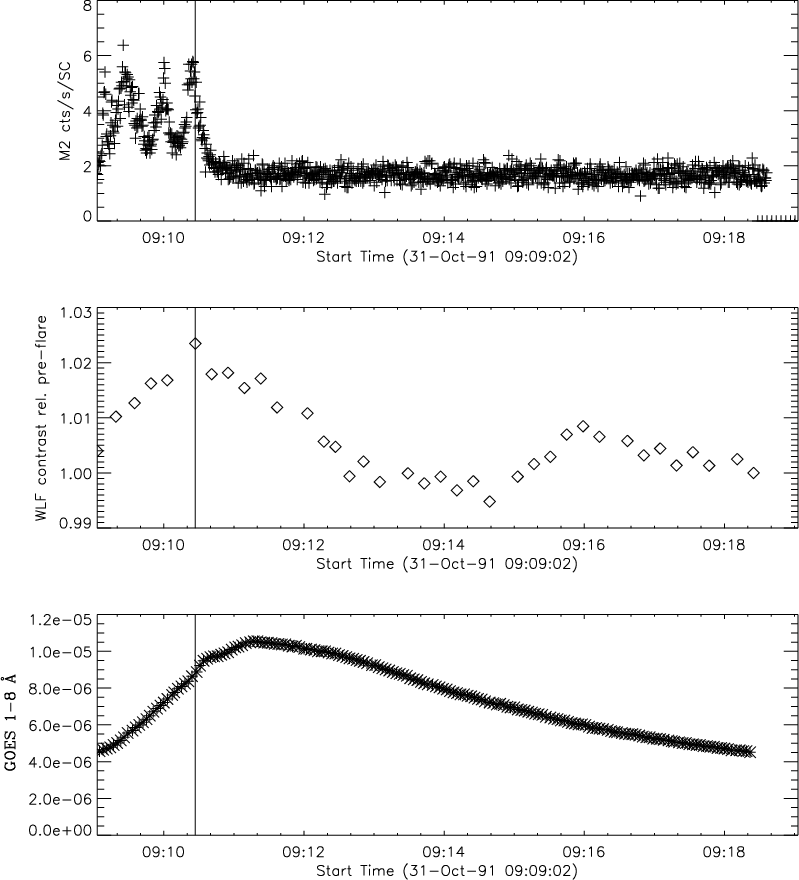
Figure 2: Time series plots of the 2 November 1991 flare. Top panel: M2 cts/s/SC. Middle panel: WLF contrast calculated relative to the pre-flare brightness in the location that the flare occurred. Lower panel: GOES 1-8 Å flux. The vertical line indicates the time of maximum WLF contrast. |
| Open with DEXTER | |
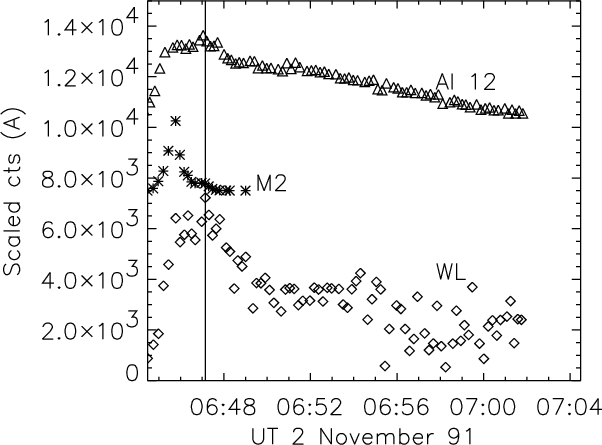 |
Figure 3: Light-curves of the WLF, M2 and Al12 emission in the northern most kernel A of the flare of 2 November 1991, centred on (820, -235). The Al12 and M2 curves have been scaled and shifted relative to the WLF curve for clarity. In this instance WLF cts are from the difference cube (DN/s). The vertical line marks the time of peak WLF cts in this kernel. |
| Open with DEXTER | |
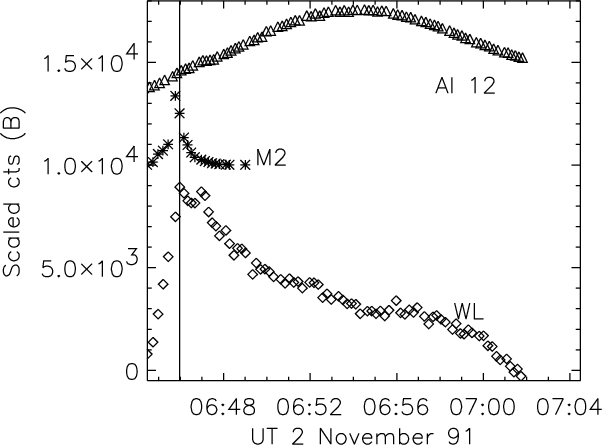 |
Figure 4: Light-curves of the WLF, M2 and Al12 emission in kernel B of the flare of 2 November 1991 centred on (850, -260). The Al12 and M2 curves have been scaled and shifted relative to the WLF curve for clarity. In this instance WLF cts are from the difference cube (DN/s). The vertical line marks the time of peak WLF cts in this kernel. |
| Open with DEXTER | |
Since SXT was not always observing the flaring active region prior to flare onset we have some cases where the beginning of our flares are not observed. Once flare mode is triggered the SXT takes some time to re-point to the flaring active region.
The SXR data were prepared in a similar manner to the white-light data with the standard calibrations: including decompression, dark current subtraction, and corrections for spacecraft jitter and roll offset. The results of the correlation tracking for the white-light data were also applied to the SXR data. We have used only data from the Al12 and Be 119 filters since many of our flares have very large SXR intensity and thinner filters showed substantial saturation.
The HXR images were constructed using the Maximum Entropy Method with a cadence that was based on the cadence of the NaBan data, t(i), such that the accumulation interval was given by [(t(i-1)+t(i))/2., (t(i)+t(i+1))/2.]provided that the count rate in the M1 channel exceeded 10 cts/s/SC (where SC is sub-collimator) in this interval. Alignment with the SXT was ensured by using an SXT flare image to determine the HXT co-ordinates for the MEM reconstruction.
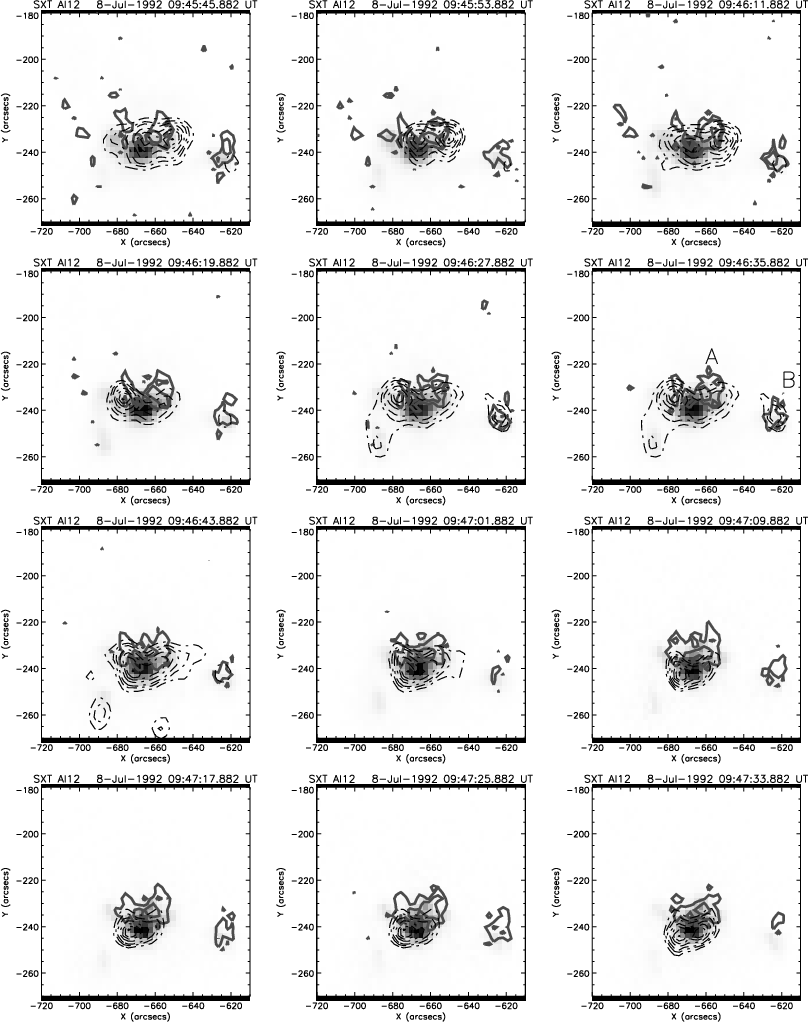 |
Figure 5: A series of images of the flare of 8 July 1992 in the Al12 filter of the SXT. Overlaid are contours of the WL emission (solid lines) and of the M2 channel (dashed black line). WLF kernel A at (-665, -235) correlates well spatially with the M2 source at this location. Both the WLF and the M2 emission in this location give the impression of a double footpoint structure. In addition there is a second WLF source, B, at (-620, -240) which also correlates well with M2 emission in this location. |
| Open with DEXTER | |
Our other main limitations with the Yohkoh WLF dataset are the comparatively
narrow passband of the filter, which includes the H![]() line at
4340 Å and the lack of spectral information. Since the passband is not wide
the contribution of H
line at
4340 Å and the lack of spectral information. Since the passband is not wide
the contribution of H![]() during flares must be assessed in order that
we may be confident that the behaviour of the emission that we observe
reflects true continuum behaviour. This is particularly important where
we observed WLF emission to persist throughout the gradual phase of some
flares and we are no longer able to measure non-thermal HXR emission. However, we defer
discussion of this issue to a subsequent work. The
lack of spectral information means that we are also unable to identify with
any certainty the height of the emission within the atmosphere. This
limitation makes it difficult for us to do more than speculate about how
the flares we observe fit into the Type I and Type II classifications.
Despite our best efforts we have been unable to find
during flares must be assessed in order that
we may be confident that the behaviour of the emission that we observe
reflects true continuum behaviour. This is particularly important where
we observed WLF emission to persist throughout the gradual phase of some
flares and we are no longer able to measure non-thermal HXR emission. However, we defer
discussion of this issue to a subsequent work. The
lack of spectral information means that we are also unable to identify with
any certainty the height of the emission within the atmosphere. This
limitation makes it difficult for us to do more than speculate about how
the flares we observe fit into the Type I and Type II classifications.
Despite our best efforts we have been unable to find
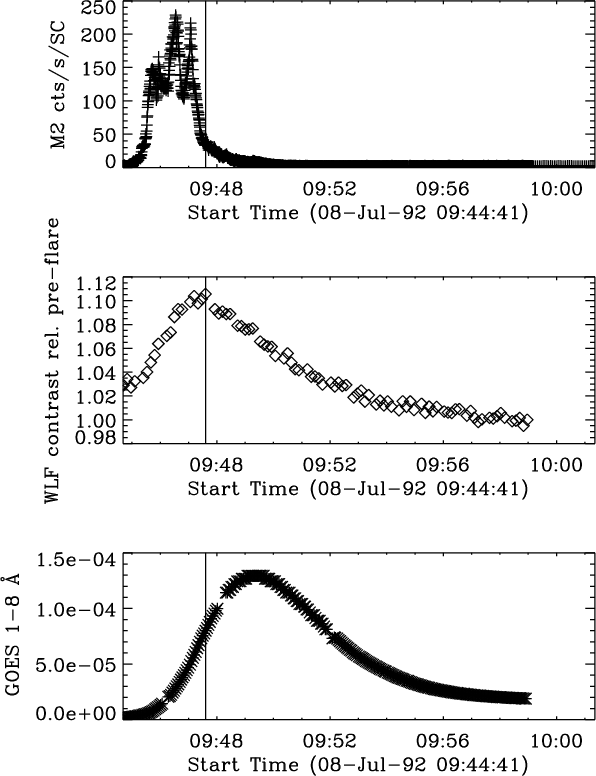 |
Figure 6: Time series plots of the 8 July 1992 flare. Top panel: M2 cts/s/SC. Middle panel: WLF contrast calculated relative to the pre-flare brightness in the location that the flare occurred. Lower panel: GOES 1-8 Å flux. The vertical line indicates the time of maximum WLF contrast. |
| Open with DEXTER | |
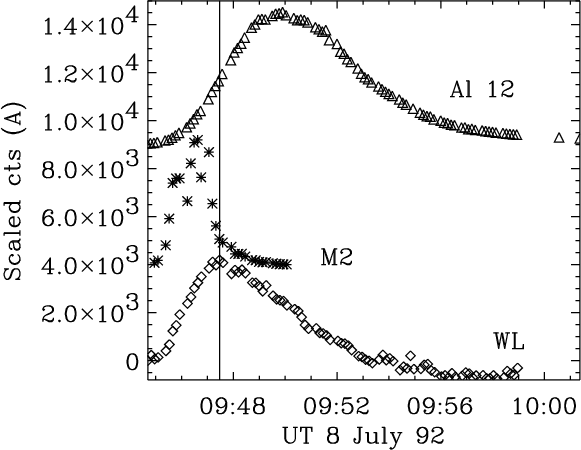 |
Figure 7: Light-curves of the WLF, M2 and Al12 emission in source A for the 8 July 1992 flare centred at (-665, -235). The Al12 and M2 curves have been scaled and shifted relative to the WLF curve for clarity. In this instance WLF cts are from the difference cube (DN/s). |
| Open with DEXTER | |
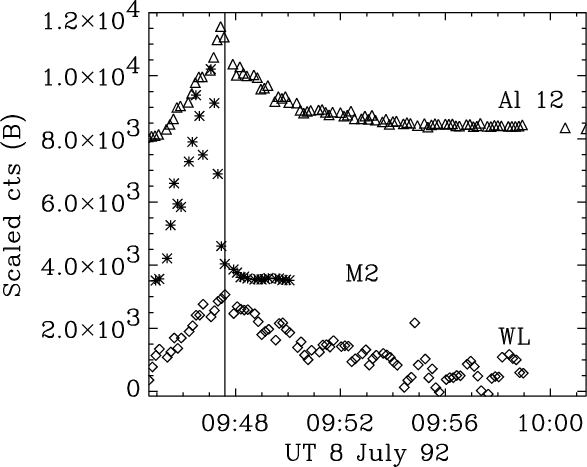 |
Figure 8: Light-curves of the WLF, M2 and Al12 emission in source B for the 8 July 1992 flare centred at (-620, -240). The Al12 and M2 curves have been scaled and shifted relative to the WLF curve for clarity. In this instance WLF cts are from the difference cube (DN/s). |
| Open with DEXTER | |
Previous studies of WLFs have almost all compared the temporal evolution of WLFs to the temporal evolution of other flare emissions at different wavelengths. In addition previous Yohkoh studies of selected WLFs (Hudson et al. 1992; van Driel-Gesztelyi et al. 1994; Matthews et al. 1998; Sylwester & Sylwester 2000) have also looked at the spatial relationship between white-light and HXR emission. As discussed in the introduction a good temporal correlation has often been found between white-light and HXR emission, and there is also often a good spatial correlation between these two emissions. However, there are clearly also many events which show somewhat different behaviour with stronger temporal correlations between WL and SXR emission. It has been suggested (Matthews et al. 1998) that these differences in behaviour may correspond to the Type I and Type II flares identified from spectral observations.
Using the data prepared for the WLF sample as described above we have investigated the spatial relationship between the WL, HXR and SXR emission, as well as the temporal relationship between these emissions averaged over the entire flare. For those events that showed more than one WLF source we have also looked at the temporal evolution of individual flare kernels in WL, HXR and SXR. Images and light-curves for all of the events in our catalogue can be seen in the Appendices. Here we present a small sample of three events, which we have chosen to illustrate the range of characteristics of the WLFs in our sample. Thus, the 2 November 1991 and 8 July 1992 events both show two kernels, while the 14 February 1992 event has a total of five. The 2 November event has one kernel that shows good temporal correlation with the HXR emission, while the second correlates better with the SXR emission. In the 8 July flare the temporal evolution of both kernels lags the HXR emission somewhat and has a quite thermal appearance. In contrast, the 14 February event has several very impulsive kernels that correlate very well with the HXR emission. In addition, the first two of these events have not previously been reported in the literature.
Figure 1 shows a series of Al12 images overlaid with contours of the WL difference and M1 channel emission, with WL indicated by solid lines, and M1 by the dashed white lines. We show here the contours of the M1 rather than M2 emission since we were able to synthesize a greater number of these and therefore they provide better coverage of the whole flare evolution. Indicated on the fourth image in the series are the locations of kernels A and B, located at (820, -240) and (850, -260) respectively. From these we can see that the spatial correlation between the WLF and the M1 emission is good, and that kernel A is almost certainly at the footpoint of a loop. Since this flare is so close to the limb it is difficult to say with certainty how the loops are oriented, but from the Al12 images and the strong thermal contribution to the light-curve, it seems likely that the region in which kernel B lies includes some loop-top emission. In view of the very similar evolution and timing of the HXR emission in the higher energy channels it seems likely that the loop orientation is such that we are seeing a convolution of loop-top and footpoint emission.
Of the two kernels that we observe, the one corresponding to WLF kernel A is the strongest in M2, but both sources show similar evolution in this channel, peaking at the same time. In the M1 channel, kernel A is again the strongest, but while both A and B peak at the same time, the intensity of kernel B decays over a much longer timescale than kernel A. Inspection of the LO channel light-curves indicates that there is a significant thermal contribution to the emission in kernel B, which would account for the the prolonged M1 decay. Of the two WLF kernels, kernel B peaks before kernel A at 06:45:58 UT, as shown in Figs. 3 and 4, although there is some scatter around the peak of A. The vertical lines in these plots mark the times of peak in the WLF light-curve. The WLF emission in B peaks 12 s after the M1 and M2 emission in this source. However, given the cadence of our observations this is consistent with a simultaneous peak in all 3 of these wavelengths for this source. Kernel B is also the stronger of the two WLF kernels with a more gradual decay. In addition to the WLF and HXR light-curves in Figs. 3 and 4 we also plot an Al12 light-curve from the region of the WLF kernels. Arguably since there is a good spatial correspondence between the WLF kernels and the HXR emission, which we believe in most cases is at the footpoints of the loop, and the SXR emission is most commonly from the body of the loop, this provides no extra useful information. However, impulsive SXR emission coincident with HXR footpoint emission has been reported in several Yohkoh flares (Hudson et al. 1994), one of which was the 26 January 1992 flare in our WLF sample. In addition we note that the SXR behaviour of the two kernels in this event show quite different behaviour, with kernel A showing an evolution similar to the HXR and WLF emission in this region.
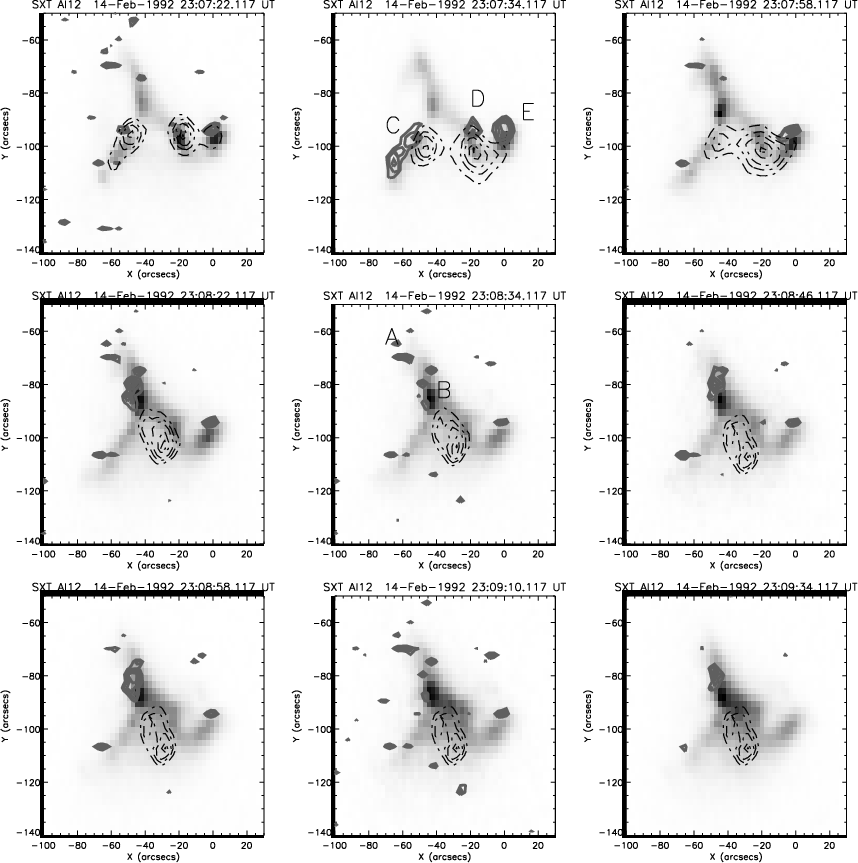 |
Figure 9: A series of images of the flare of 14 February 1992 in the Al12 filter of the SXT. Overlaid are contours of the WL emission (solid lines) and of the M1 channel (dashed black line). There are 5 WLF kernels, 4 of which correlate well spatially with the M1 sources during the impulsive phase of the flare. |
| Open with DEXTER | |
Figure 6 shows the overall temporal evolution of the event in the same manner as Fig. 2, with an integrated M2 light-curve in the top panel; WLF contrast in the middle and GOES flux in the lower panel. Here we see that the WLF contrast is somewhat less obviously impulsive than in the 2 November 1991 event, and indeed, although peaking some three minutes earlier than the SXR light-curve, shows a very similar thermal nature.
The WLF emission in kernel A, the stronger of the two kernels, peaks at 09:47:27 UT, 8 s prior to the emission in kernel B, as shown in Figs. 7 and 8. However, the cadence of our observations does not rule this out as a simultaneous maximum for the two kernels. Although the two WLF kernels show similar behaviour and peak timing, they are somewhat delayed relative to the HXR emission. The M2 emission in kernel A peaks at 09:46:37 UT, while in kernel B the peak occurs at 09:47:03 UT. The WLF emission is thus delayed relative to the M2 by 50 s in kernel A and 28 s in kernel B. We also note in this event that the SXR light-curves of the two events are somewhat different, with kernel B showing a quite impulsive curve that peaks almost simultaneously with the WLF emission.
Kernels A, C, D and E have peaks in WL emission which occur within 12 s of the peak of
the M2 emission in these regions as shown in Figs. 11, and 13-15, suggesting simultaneity within the measurement
limitations. The same is
true for the M1 channel emission. The WLF light-curve in kernel B has a somewhat less well defined
peak which peaks somewhat after
the HXR emission, as shown in Fig. 12. As can be seen in Fig. 10 the integrated HXR
light curve and the flare contrast as a whole also show peaks which are simultaneous. What can also
be seen from this figure and the figures of the individual light-curves, however, is that there
is an extended tail of WL emission that continues for some minutes after the impulsive phase has
ended. The decay phase of this event occurred during Yohkoh's passage through the South Atlantic
Anomaly (SAA) during which time HXT does not observe. However, the LO channel light-curve prior to
entry into SAA at 23:09 UT shows that the count rate in this energy range has only decreased to
half of its peak value at this point in the flare. In this event also we note that kernels A and
E show impulsive SXR behaviour which peaks
with the WLF and HXR emission.
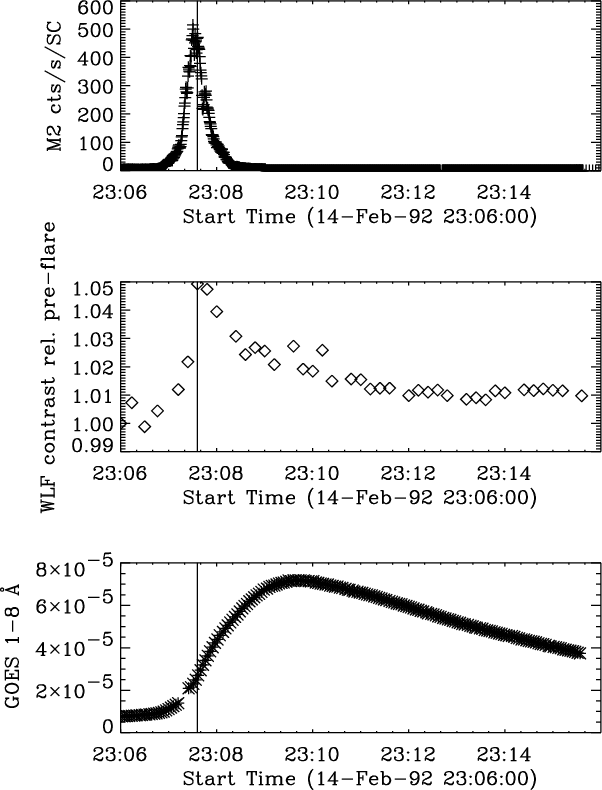 |
Figure 10: Time series plots of the 14 February 1992 flare. Top panel: M2 cts/s/SC. Middle panel: WLF contrast calculated relative to the pre-flare brightness in the location that the flare occurred. Lower panel: GOES 1-8 Å flux. The vertical line indicates the time of maximum WLF contrast. |
| Open with DEXTER | |
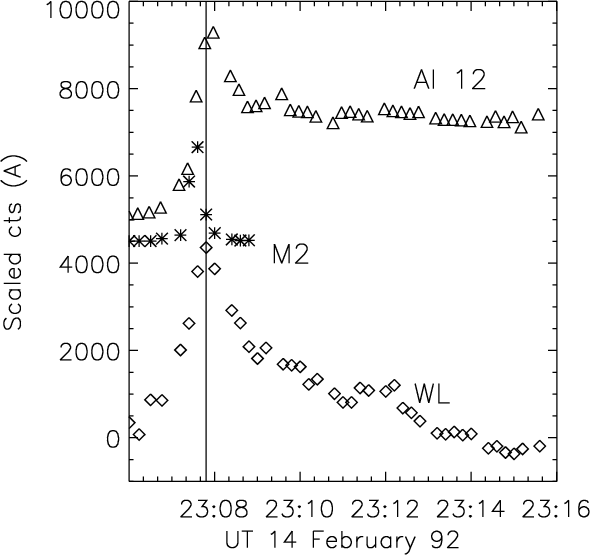 |
Figure 11: Light-curves of the WLF, M2 and Al12 emission in the northern most kernel (A) of the flare of 14 February 1992, centred on (-60, -70). The Al12 and M2 curves have been scaled and shifted relative to the WLF curve for clarity. In this instance WLF cts are from the difference cube (DN/s). |
| Open with DEXTER | |
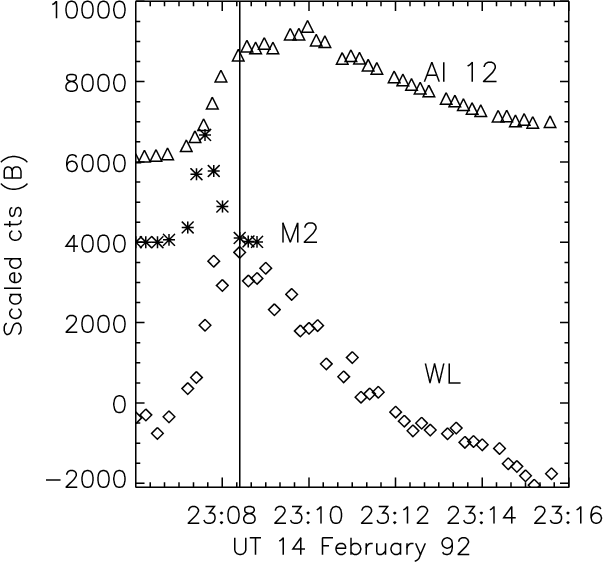 |
Figure 12: Light-curves of the WLF, M2 and Al12 emission in kernel B of the flare of 14 February 1992, centred on (-50, -85). The Al12 and M2 curves have been scaled and shifted relative to the WLF curve for clarity. In this instance WLF cts are from the difference cube (DN/s). |
| Open with DEXTER | |
In Fig. 16 we have plotted the peak electron beam power versus the
peak GOES flux for both our WLF (![]() )
and non-WLF (*) samples. The peak beam energy
is calculated for a standard thick target scenario (e.g. Brown 1971; Hudson 1972) based on
a 20 keV low energy cut-off. It is unlikely that, if WLF emission is produced in the lower
chromosphere or upper photosphere, electrons of this energy would be able to directly deposit
their energy at the relevant level of the atmosphere. However, as noted in the introduction, Hudson
(1972) has shown that
the electrons that have sufficient energy to reach the appropriate level of the atmosphere do not
have enough energy to account for the WLF enhancements. Instead he suggested that the 5-20 keV
range was capable of producing the WLF emission, the opacity required being produced by
non-thermal ionization.
)
and non-WLF (*) samples. The peak beam energy
is calculated for a standard thick target scenario (e.g. Brown 1971; Hudson 1972) based on
a 20 keV low energy cut-off. It is unlikely that, if WLF emission is produced in the lower
chromosphere or upper photosphere, electrons of this energy would be able to directly deposit
their energy at the relevant level of the atmosphere. However, as noted in the introduction, Hudson
(1972) has shown that
the electrons that have sufficient energy to reach the appropriate level of the atmosphere do not
have enough energy to account for the WLF enhancements. Instead he suggested that the 5-20 keV
range was capable of producing the WLF emission, the opacity required being produced by
non-thermal ionization.
The figure shows clearly that WLFs tend toward higher beam power with increasing
GOES flux. The same is true for the non-WLFs, although there is somewhat greater scatter in
this group. Also, there is a hint that in the overlap region between the two groups the WLFs have a
higher beam energy for a particular GOES class than the non-WLFs. Particularly noticeable in this
figure is the lack of non-WLF events at high GOES
intensity; above the M8 level all flares are WLFs and all five X-class flares that were observed
over the period of the Aspect Camera's operation are WLFs.
In addition to the distinction between non-WLFs and WLFs we also distinguish between ![]() 5% and
<5% contrast levels in the WLFs with the large symbols representing the higher contrast events.
Again this shows that, on average, the high contrast WLFs have both high beam energy and high
GOES flux, somewhat suggestive of BFS (Kahler 1982).
5% and
<5% contrast levels in the WLFs with the large symbols representing the higher contrast events.
Again this shows that, on average, the high contrast WLFs have both high beam energy and high
GOES flux, somewhat suggestive of BFS (Kahler 1982).
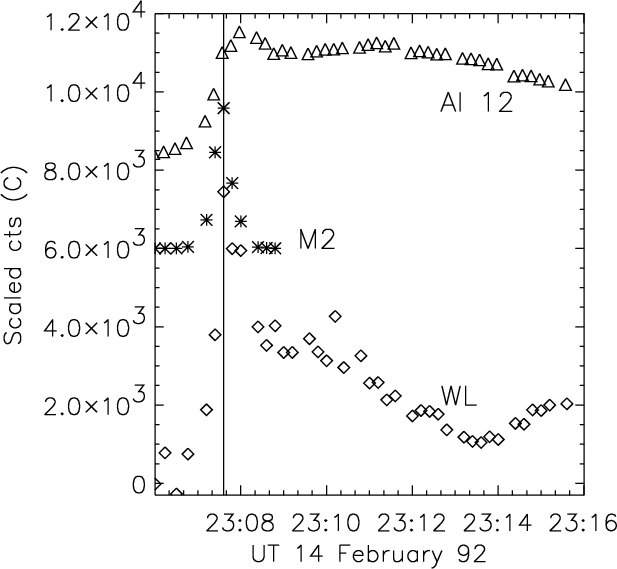 |
Figure 13: Light-curves of the WLF, M2 and Al12 emission in kernel C of the flare of 14 February 1992, centred on (-55, -95). The Al12 and M2 curves have been scaled and shifted relative to the WLF curve for clarity. In this instance WLF cts are from the difference cube (DN/s). |
| Open with DEXTER | |
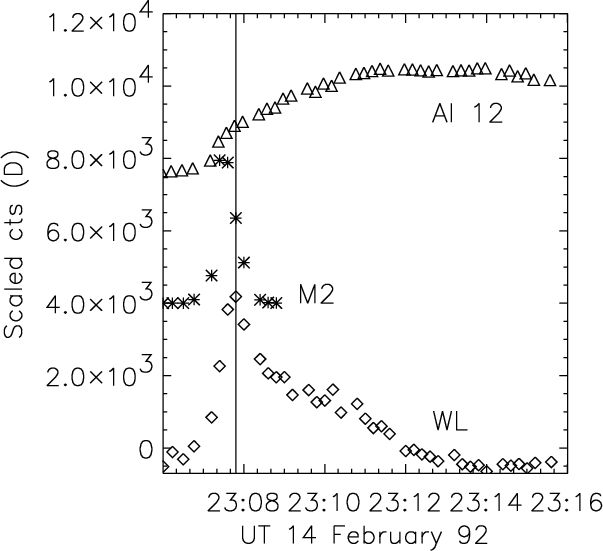 |
Figure 14: Light-curves of the WLF, M2 and Al12 emission in kernel D of the flare of 14 February 1992, centred on (-20, -95). The Al12 and M2 curves have been scaled and shifted relative to the WLF curve for clarity. In this instance WLF cts are from the difference cube (DN/s). |
| Open with DEXTER | |
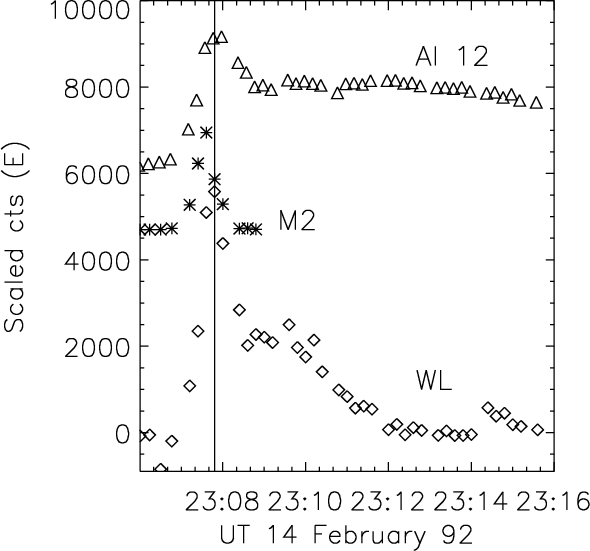 |
Figure 15: Light-curves of the WLF, M2 and Al12 emission in the northern most kernel E of the flare of 14 February 1992, centred on (0, -95). The Al12 and M2 curves have been scaled and shifted relative to the WLF curve for clarity. In this instance WLF cts are from the difference cube (DN/s). |
| Open with DEXTER | |
In Fig. 17 we show the occurrence frequency of the peak beam energy of the
non-WLFs, and the low and high contrast WLF groups, as defined above. This shows, as does
Fig. 16, that there is essentially a continuum of beam energy from the non-WLFs
through to the WLFs, with a region of overlap occurring between
![]() -
-
![]() ergs s-1, where both types of flare are found.
Within this range those flares with
peak GOES flux
ergs s-1, where both types of flare are found.
Within this range those flares with
peak GOES flux ![]() M1 level are primarily non-WLFs with only two exceptions, both of which fall
into the <5% category of WLF contrast, although as can be seen in Fig. 18, they
do not have the lowest contrast of our sample. The range of parameters that covers beam energy
between
M1 level are primarily non-WLFs with only two exceptions, both of which fall
into the <5% category of WLF contrast, although as can be seen in Fig. 18, they
do not have the lowest contrast of our sample. The range of parameters that covers beam energy
between
![]() -
-
![]() ergs s-1 and peak GOES flux in the M1-M8 range
then contains 17 WLFs, 12 of which have high contrast, and 21 non-WLFs. As mentioned above there is a tendency for
the WLFs to have higher beam energy for a given GOES intensity in this region, nevertheless this
region perhaps provides one of the most potentially fruitful for discovering a determinant factor
for the production of WLF emission.
ergs s-1 and peak GOES flux in the M1-M8 range
then contains 17 WLFs, 12 of which have high contrast, and 21 non-WLFs. As mentioned above there is a tendency for
the WLFs to have higher beam energy for a given GOES intensity in this region, nevertheless this
region perhaps provides one of the most potentially fruitful for discovering a determinant factor
for the production of WLF emission.
 |
Figure 16:
Scatter plot showing the relationship between peak GOES flux in the 1-8 Å channel and the peak electron beam power calculated for a thick target assumption
and a low energy cut-off of 20 keV. * represents the non-WLFs and |
| Open with DEXTER | |
While there is some indication of the effect of beam power on the peak value of WLF
contrast from the different size symbols in Fig. 16 we have plotted these two
quantities in Fig. 18. For beam energies <
![]() ergs s-1there is some spread in contrast but little obvious increasing trend. The peak contrast for these beam
energies is <8%. Above these energies
the contrast shows an increase
with beam energy, although still with a fair amount of scatter. The highest beam power in our non-WLF group
is
ergs s-1there is some spread in contrast but little obvious increasing trend. The peak contrast for these beam
energies is <8%. Above these energies
the contrast shows an increase
with beam energy, although still with a fair amount of scatter. The highest beam power in our non-WLF group
is
![]() ergs s-1 which might again lead us toward the conclusion that BFS has a role to play in
the production of WLF emission.
ergs s-1 which might again lead us toward the conclusion that BFS has a role to play in
the production of WLF emission.
| |
Figure 17: Histogram showing the distribution of electron beam power for non-WLFs, WLFs with peak contrast <5% and WLFs with peak contrast >5%. |
| Open with DEXTER | |
In light of the fact that the electron beam power we have used is model dependent
we have also looked at the ratio of the peak counts in the M2 to M1 channel of the HXR emission
for each group. A scatter plot of the variation of peak M2/M1 with peak GOES flux is shown
in Fig. 19. As in previous plots, ![]() represents a WLF, with larger symbols
indicating peak contrast
represents a WLF, with larger symbols
indicating peak contrast ![]() 5% and * are the non-WLFs. Here there appears to be no distinction
between WLFs and non-WLFs in terms of this spectral ratio. In addition, peak WLF contrast also seems to be
unaffected by this quantity, as shown in Fig. 20.
5% and * are the non-WLFs. Here there appears to be no distinction
between WLFs and non-WLFs in terms of this spectral ratio. In addition, peak WLF contrast also seems to be
unaffected by this quantity, as shown in Fig. 20.
Figure 21 shows the relationship between the impulsiveness of the M2
emission and the peak beam power, for both the
non-WLFs and WLFs. Again the larger diamond symbols highlight the WLFs with high contrast.
The impulsiveness was defined simply as the gradient of the M2 light-curve from the point
at which it exceeded 3![]() above the non-flare background to the peak normalized to the
peak M2 flux. We have not in
this measure taken into account any peaks which occur during the rise to maximum. Thus larger
impulsiveness indicates a steeper rise phase of the M2 light-curve. This plot shows that there
is little dependence of beam power on impulsiveness.
In addition, there seems to be no dependence of WLF contrast on the impulsiveness of
the M2 emission.
above the non-flare background to the peak normalized to the
peak M2 flux. We have not in
this measure taken into account any peaks which occur during the rise to maximum. Thus larger
impulsiveness indicates a steeper rise phase of the M2 light-curve. This plot shows that there
is little dependence of beam power on impulsiveness.
In addition, there seems to be no dependence of WLF contrast on the impulsiveness of
the M2 emission.
In addition to looking for relationships between the WLF and HXR emission we also
looked at the WLF's relationship to the SXR emission. It has been suggested by Rust (1986)
that high temperature and high pressure conditions in flares of GOES class ![]() M5 might be
responsible for WLFs that do not show Balmer discontinuities, as a result of the extreme
narrowing of the chromosphere in this circumstance. Although we do not have the spectral
information available to us to differentiate between those WLFs that show Balmer jumps and
those that do not, we have investigated differences in coronal pressure for non-WLFs and WLFs.
M5 might be
responsible for WLFs that do not show Balmer discontinuities, as a result of the extreme
narrowing of the chromosphere in this circumstance. Although we do not have the spectral
information available to us to differentiate between those WLFs that show Balmer jumps and
those that do not, we have investigated differences in coronal pressure for non-WLFs and WLFs.
We derive the pressure using data from the Be 119 and Al12 filters on the SXT using the emission measure
calculated from the Be 119 filter and temperature calculated from the ratio. In order to estimate
the pressure we have of course made an assumption about the geometry of the region, and for
simplicity assumed a filling factor of unity and a volume equal to the area3/2 above half maximum.
Thus we will have both systematic and direct errors in our estimation. In Fig. 22
we plot the peak value of the pressure for the WLFs (![]() )
and the non-WLFs (*) versus peak flux in the Be 119
filter. From this plot we can see that there is a strong correlation
between peak coronal pressure and the occurrence of WLFs. Computing the linear correlation coefficient
between the peak Be flux and peak pressure we find this to be 0.70 for the WLF sample, compared to
0.10 for the non-WLF sample. On the basis of this relationship,
we were able to identify the 17 November 1991 event as a probable WLF candidate.
)
and the non-WLFs (*) versus peak flux in the Be 119
filter. From this plot we can see that there is a strong correlation
between peak coronal pressure and the occurrence of WLFs. Computing the linear correlation coefficient
between the peak Be flux and peak pressure we find this to be 0.70 for the WLF sample, compared to
0.10 for the non-WLF sample. On the basis of this relationship,
we were able to identify the 17 November 1991 event as a probable WLF candidate.
However, despite the obvious difference in the correlation coefficients for our two samples, we recognize
that since the pressure is derived using the flux measured in the Be filter we might expect the two
quantities
to be well correlated purely on this basis. Therefore, in
Fig. 23 we show the peak value of pressure for the WLFs
(![]() )
and the non-WLFs (*) with peak GOES flux. From this plot we
can see that the correlation
between peak coronal pressure and the occurrence of WLFs remains, but the correlation is somewhat lower in
this case. Here we find the correlation between peak GOES flux and pressure to be 0.32 for the WLF sample
and 0.24 for the non-WLF sample. However, we note that our largest GOES class event was truncated and that
our pressure determination in this case may be an under-estimate. We thus believe the trend here
is still strong and that it is real.
)
and the non-WLFs (*) with peak GOES flux. From this plot we
can see that the correlation
between peak coronal pressure and the occurrence of WLFs remains, but the correlation is somewhat lower in
this case. Here we find the correlation between peak GOES flux and pressure to be 0.32 for the WLF sample
and 0.24 for the non-WLF sample. However, we note that our largest GOES class event was truncated and that
our pressure determination in this case may be an under-estimate. We thus believe the trend here
is still strong and that it is real.
In recognition of the limitations of temperatures derived from the SXT filter ratio and the strong contribution that the emission measure will have on the pressure we have also calculated the SXR scale length to satisfy ourselves that high pressure does not simply indicate high SXR flux. Figure 24 shows the SXR scale-length with GOES flux. It can be seen here that whilst there is scatter there is no variation with GOES flux, which suggests to us that the pressure variation is not simply another indication of BFS.
 |
Figure 18: Scatter plot showing the relationship between the peak electron beam power calculated for a thick target assumption and a low energy cut-off of 20 keV and the maximum WLF contrast relative to the pre-flare continuum intensity in the flare region. |
| Open with DEXTER | |
 |
Figure 19:
Scatter plot showing the relationship between the peak GOES flux in
the 1-8 Å channel and the peak value of M2/M1 for both non-WLFs and WLFs.
* represents the non-WLFs and |
| Open with DEXTER | |
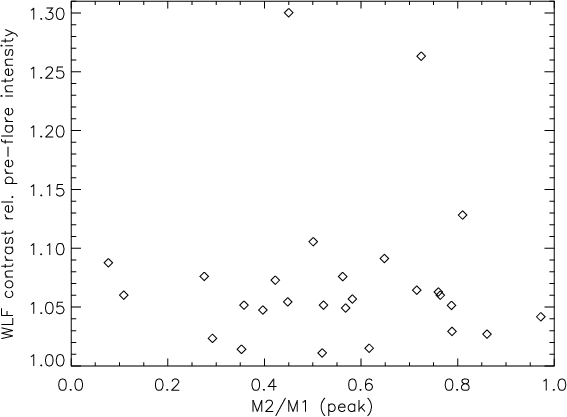 |
Figure 20:
Scatter plot showing the relationship between the peak value of M2/M1
and the peak WLF contrast relative to the pre-flare continuum intensity in the flare region.
Here * represents the non-WLFs and |
| Open with DEXTER | |
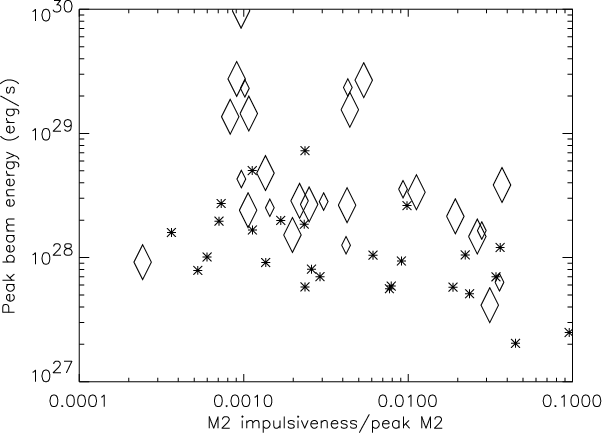 |
Figure 21:
Scatter plot showing the relationship between the impulsiveness of the
M2 emission, determined as described in the text, and the peak beam energy
calculated for a thick target assumption and a low energy cut-off of 20 keV.
* represents the non-WLFs and |
| Open with DEXTER | |
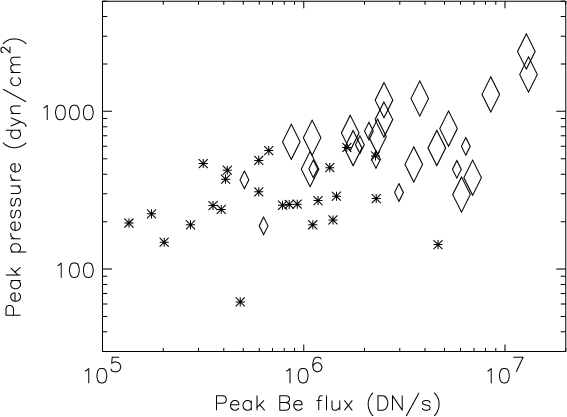 |
Figure 22:
Scatter plot showing peak coronal pressure against peak Be 119 flux.
* represents non-WLFs, and |
| Open with DEXTER | |
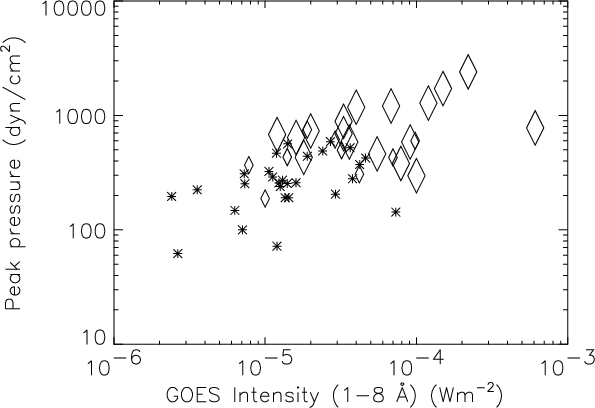 |
Figure 23:
Scatter plot showing peak coronal pressure against peak GOES intensity.
* represents non-WLFs, and |
| Open with DEXTER | |
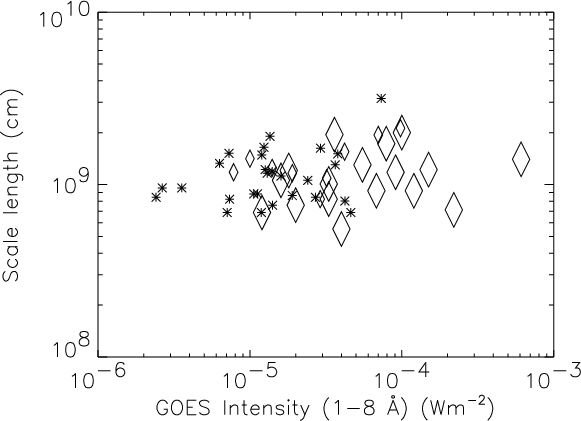 |
Figure 24:
Scatter plot showing SXR scale length =
|
| Open with DEXTER | |
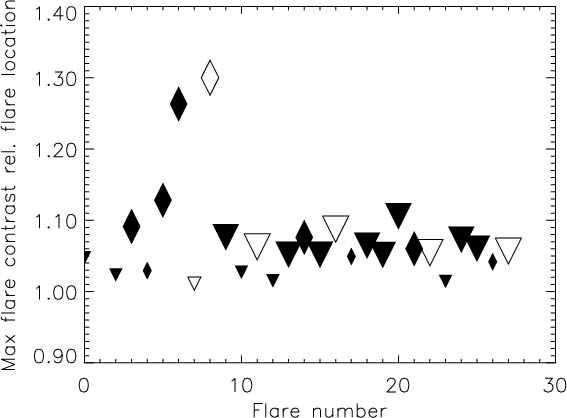 |
Figure 25:
Scatter plot showing the peak WLF contrast relative to the pre-flare
continuum intensity in the flare region. |
| Open with DEXTER | |
We have determined the WLF contrast using two methods. The first was a measurement of the increased intensity of the flare relative to the pre-flare intensity in the actual flare location, and the second measurement that we made was of the flare intensity relative to the neighbouring quiet photospheric intensity. In both cases we averaged over the region of the WLF emission in each frame, then for our first measurement we divided this average intensity by the average intensity in this region pre-flare. For the measurement relative to the quiet photosphere we divided this average intensity per frame by the average intensity in a neighbouring quiet region. Table 1 lists the maximum average percentage contrast measured relative to the pre-flare intensity in the actual flare location. We can see from this that in general those flares with the largest GOES flux are the flares with the highest WLF contrast. The relationship is not a simple one-to-one correlation, however. Examples of the WLF intensity relative to the pre-flare intensity in the enhanced region can be seen in Figs. 2, 6 and 10. Plots of the WLF contrast relative to the quiet photosphere show the same temporal evolution with somewhat reduced absolute values. The reason for this may be that many of our WLF kernels appeared in penumbrae or umbrae rather than quiet photosphere, thus the relative enhancement above a patch of neighbouring quiet photosphere is correspondingly lower than the relative flare enhancement in the flare region itself.
In Fig. 25 we show a scatter plot of the peak WLF contrast relative to the pre-flare
continuum intensity in the flare region. Flares that had ![]() -ray emission reported to be
associated with them are represented by diamonds, while those without are represented by triangles.
Large symbols indicate those flares with peak contrast
-ray emission reported to be
associated with them are represented by diamonds, while those without are represented by triangles.
Large symbols indicate those flares with peak contrast ![]() 5% and filled symbols identify those
flares that occurred on the solar disk while those that occurred at the limb (defined as >70
5% and filled symbols identify those
flares that occurred on the solar disk while those that occurred at the limb (defined as >70![]() )
have open symbols.
Our
)
have open symbols.
Our ![]() -ray associations come from Matsumoto (2002) who identified 10 of our WLFs using
the GRS 0.2-1 MeV count rate on the Wide Band Spectrometer on Yohkoh (Yoshimori et al. 1991).
Based on her results we note that only three of our events
show unequivocal nuclear line emission: 27 October 91, 15 November 91 and 3 December 91.
However,
none of the flares in the non-WLF sample show nuclear line emission.
Of the events listed in Neidig & Cliver (1983) and Neidig et al.
(1993) we find that of 30 WLFs identified during the period of operation of the Solar Maximum Mission
Gamma Ray Spectrometer, 15 had associated
-ray associations come from Matsumoto (2002) who identified 10 of our WLFs using
the GRS 0.2-1 MeV count rate on the Wide Band Spectrometer on Yohkoh (Yoshimori et al. 1991).
Based on her results we note that only three of our events
show unequivocal nuclear line emission: 27 October 91, 15 November 91 and 3 December 91.
However,
none of the flares in the non-WLF sample show nuclear line emission.
Of the events listed in Neidig & Cliver (1983) and Neidig et al.
(1993) we find that of 30 WLFs identified during the period of operation of the Solar Maximum Mission
Gamma Ray Spectrometer, 15 had associated ![]() -ray emission in the 0.3-8.5 MeV range, and of these
a sub-set of 7 showed nuclear line emission in addition (Vestrand et al. 1999). Neither of these samples
indicates any obvious relationship between WLF and
-ray emission in the 0.3-8.5 MeV range, and of these
a sub-set of 7 showed nuclear line emission in addition (Vestrand et al. 1999). Neither of these samples
indicates any obvious relationship between WLF and ![]() -ray emission.
-ray emission.
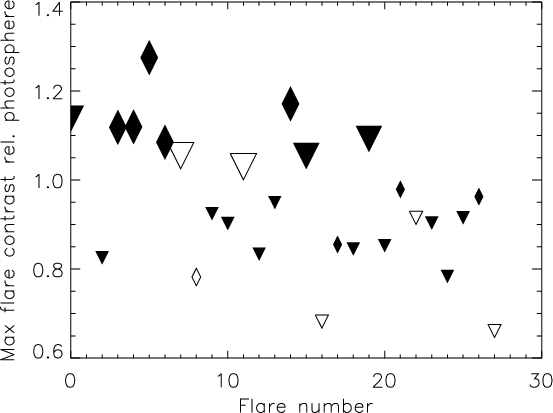 |
Figure 26:
Scatter plot showing the peak WLF contrast relative to the neighbouring quiet
photospheric continuum intensity. |
| Open with DEXTER | |
Figure 26 is similar to Fig. 25 but shows the peak contrast relative to the neighbouring quiet photosphere, with symbols as described for the previous plot. Flares are plotted in chronological order (and identified by flare # in Table 1) so we see that in this plot there is a trend for the photospheric contrast to decrease with time. We do not believe that this effect is due to the loss of sensitivity that SXT suffered with time since the derived contrast is a relative measure. We speculate instead that the trend is due to an increasing occurrence of WLFs in the penumbra and umbra, particularly since we do not see the same trend in Fig. 25.
We have presented here the properties of a sample of 28 WLFs and 31 non-WLFs that were observed simultaneously with the white-light, soft and hard X-ray imaging instruments on-board the Yohkoh spacecraft. This single platform, multi-wavelength data-set provides a sample of white-light flares whose consistency is unavailable elsewhere. In addition, we have a similar set of observations over the same period of time that show no measurable enhancement in white-light and provide us with a benchmark against which to measure the characteristics of the WLFs. In this catalogue we have focused primarily on reporting the observations and general properties of the two data-sets and while we draw some general conclusions, we leave the detailed interpretation of some of our results to a subsequent work.
We find, as others have, that there is a generally good spatial and temporal coincidence between HXR and WLF emission during the flare impulsive phase, and we identify these types of WLF as being likely to fall into the Type I category of WLFs. However, in addition to these cases we also find that WLF emission often continues beyond the end of the impulsive phase and can show a stronger temporal correlation with 14-23 keV emission measured by Yohkoh, which is predominantly thermal, or with the SXR emission. This has also been noted by Sylwester & Sylwester (2000). This type of behaviour is inconsistent with the characteristics of Type I WLFs.
In Tables 1 and 2 in addition to the basic identification of the events in terms of time and location we have listed also flare and active region classifications and associations with Type II and III radio emission as reported in Solar Geophysical Data. Neidig & Cliver (1983) noted in their sample of WLFs a 60% association to Type II bursts and a 79% association with Type III emission. We have made an association between the flares in our sample and the Type II and III bursts listed if the timing of the radio bursts placed them during the impulsive phase of the flare. Table 1 lists additional information relevant to the WLF group, including number of kernels observed, maximum percentage contrast and the location of the WLF kernels relative to the photosphere and sunspot boundaries.
Table 3: Mean values and standard deviations of the M2/M1 ratio (33-53/23-33 keV), electron beam power above 20 keV and coronal pressure for both non-WLFs and WLFs.
Table 4: Average properties of the WLF and non-WLF samples. a From Solar Geophysical Data in millionths of a solar hemisphere; b Active region class was calculated by assigning values to the different classifications as follows: BGD/BD = 4; BG/BP = 3; B = 2 and A = 1.
In Table 4 we list some additional average properties for our two samples, including latitude
(in both the North and South hemispheres); frequency of flare occurrence in each hemisphere;
central meridian distance; corrected area; active region class; H![]() importance, GOES class and
association with Type II and III radio bursts. We find little difference in the average latitude
of the flares in either group or hemisphere. Similarly, the average central meridian distance is
essentially the same for both WLFs and non-WLFs. However, we do see a hemispheric asymmetry in the
distribution of WLFs: in our sample 73% occurred in the Southern hemisphere. This is in fact
the opposite behaviour to that seen by Neidig & Cliver (1983). The average corrected area is slightly larger in
the WLF case than the non-WLF case, but the spread for both groups is large. We calculated the mean
active region class by assigning values to the different classifications as follows:
importance, GOES class and
association with Type II and III radio bursts. We find little difference in the average latitude
of the flares in either group or hemisphere. Similarly, the average central meridian distance is
essentially the same for both WLFs and non-WLFs. However, we do see a hemispheric asymmetry in the
distribution of WLFs: in our sample 73% occurred in the Southern hemisphere. This is in fact
the opposite behaviour to that seen by Neidig & Cliver (1983). The average corrected area is slightly larger in
the WLF case than the non-WLF case, but the spread for both groups is large. We calculated the mean
active region class by assigning values to the different classifications as follows:
![]() ;
;
![]() ;
;
![]() and
and ![]() .
Using this method we find that there is no difference in active region classification
for the two groups.
.
Using this method we find that there is no difference in active region classification
for the two groups.
When considering H![]() and GOES classifications we do see a distinct difference between
the two groups. 72% of the WLF group are Bright in H
and GOES classifications we do see a distinct difference between
the two groups. 72% of the WLF group are Bright in H![]() ,
while this figure is only 20% for
the non-WLF group. Similarly, the average GOES class of the WLF group is M7.5, while for the non-WLFs
it is M2.2. We also note that 21% of the WLFs have associated Type II radio bursts as compared
with 7% of non-WLFs. We find a somewhat lower association to Type II bursts in our WLF group than Neidig & Cliver
(1983) at 21%, and for Type III at 64%. However, these are markedly higher than the equivalent associations
seen in the non-WLF group. We might once again be led to the conclusion that
this is a consequence of BFS.
However,
we note that there are flares of higher GOES classification that have no associated Type II or III emission
in both of our samples.
,
while this figure is only 20% for
the non-WLF group. Similarly, the average GOES class of the WLF group is M7.5, while for the non-WLFs
it is M2.2. We also note that 21% of the WLFs have associated Type II radio bursts as compared
with 7% of non-WLFs. We find a somewhat lower association to Type II bursts in our WLF group than Neidig & Cliver
(1983) at 21%, and for Type III at 64%. However, these are markedly higher than the equivalent associations
seen in the non-WLF group. We might once again be led to the conclusion that
this is a consequence of BFS.
However,
we note that there are flares of higher GOES classification that have no associated Type II or III emission
in both of our samples.
When initially identifying our event sample we had the expectation, based on previous studies of the relationship between white-light and hard X-ray emission, that the WLF sample would have associated hard X-ray emission that was both intense and displayed a characteristically harder spectrum than the non-WLF sample. While we have found a strong correlation with electron beam energy and WLF emission, the relationship between WLFs and hard X-ray spectral hardness appears to be less pronounced. However, in Table 3 we indicate the mean and standard deviation of the electron beam power above 20 keV and ratio of the peak M2/M1 ratio for both the WLFs and non-WLFs. We see that indeed the WLFs show, on average, an order of magnitude greater electron beam power. The M2/M1 ratio, although having a higher mean value for the WLF group, shows a similar standard deviation for the two groups which suggests little significant difference between the two samples. In order to quantify these differences further we have applied a Student's t-test to determine whether the means of our two samples differ at a statistically significant level for electron power and peak M2/M1 ratio. We find that for electron power the means of the WLFs and non-WLFs differ at the 96% confidence level. For the M2/M1 ratio, the two samples differ at the 80% confidence level, suggesting that the electron power is the more significant factor. At first glance greater electron beam power in WLFs seems consistent with the idea that white-light emission is produced in large flares that produce more of everything, i.e. BFS (Kahler 1982).
Table 5: Mean values and standard deviations of M2/M1, electron beam power above 20 keV and coronal pressure for both non-WLFs and WLFs in the overlap regions of GOES class C7.8 - M7.4.
Also listed in Table 3 are the mean and standard deviation of the peak coronal pressure for both groups. Here we see that the mean pressure in the WLF sample is substantially higher than in the non-WLF sample. Once again we have employed a Student's t-test in order to quantify the significance of the difference in means. We find from this that the two samples differ at a >99% confidence level, suggesting that high coronal pressure is a very real property of WLFs.
While it seems clear that on average our WLF sample shows many of the characteristics that might suggest that flare related continuum enhancements are just the result of larger flares producing more of emission at all wavelengths, we are reluctant to conclude that this is the only determinant factor. Figures 16 and 22 show clearly that the two groups of flares do not fall into two distinct populations; instead there is a clear region of overlap between the two groups with flares of equivalent GOES class falling into both categories. Since this region is clearly a real potential key to determining the factors that differ between flares that do and do not produce enhanced continuum emission, we have made some further statistical investigations based on the flares in both groups which fall into the range between C7.8 and M7.4. We list the mean and standard deviations for electron power, M2/M1 and coronal pressure for this sub-sample in Table 5.
Applying a Student's t-test to these sub-samples we find that the electron power distributions differ only at the 80% confidence level, while the pressure differs again at the >99% confidence level and M2/M1 ratio at the 90% level. From this it appears that the strongest determining factor in producing WLF emission is a high coronal pressure. A high M2/M1 ratio seems important to a lesser extent, despite the apparent lack of correlation shown in Fig. 19.
"Big Flare Syndrome'' suggests that regardless of the model or process considered, the flare parameters measured will scale with the size of the energy release, leading to the measurement of statistically significant correlations irrespective of a causal relationship. Thus the application of this to WLFs suggests that WLF emission at some level is produced in all flares and becomes measurable to us as the energy release increases, as this leads to a greater continuum enhancement. In addition if this premise holds then greater energy release should produce correspondingly greater pressure, electron power and so on in all flares. We believe that our results show that comparable energy release, as crudely measured by peak GOES flux, does not correspondingly lead to comparable increases in coronal pressure, electron power or continuum enhancement, and consequently that WLF emission is not a mere consequence of BFS.
Acknowledgements
Yohkoh was a hugely successful collaborative mission of the Institute of Space and Astronautical Science (ISAS) in Japan and the UK and USA Launched in August 1991, it operated for an amazing 10 years until 15 December 2001. We would like to acknowledge the phenomenal contribution that Yohkoh and the Yohkoh team have made to our understanding of Solar Physics over the period of its operation, and will continue to make through the legacy of the remaining data. Data in this publication were provided both by ISAS and the Solar UK Research Facility at the Mullard Space Science Laboratory, University College London. SAM and LvDG would like to thank The Royal Society for funding through their Joint Project scheme. LvDG was supported by the Research Fellowship F/02/035 of the K.U. Leuven and by the Hungarian Government grant OTKA T-038013. HSH and NVN were supported by NASA contract NAS8-00119. HSH is currently supported by NAG5-12878.
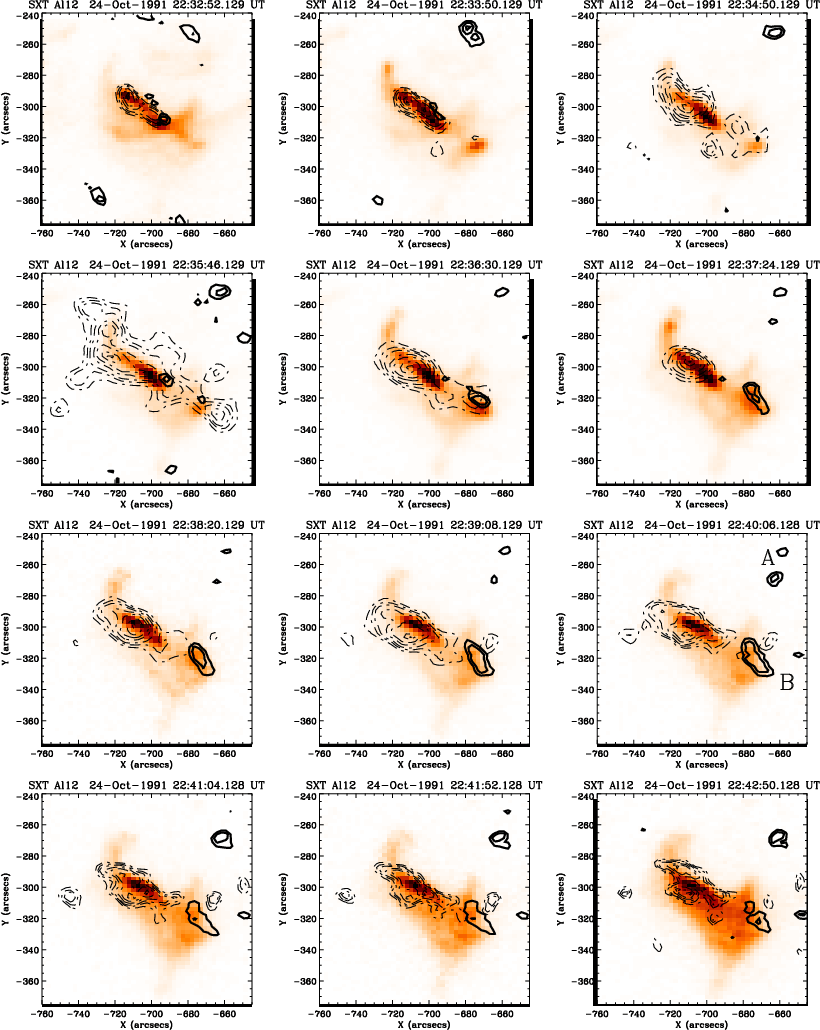 |
Figure A.4: A series of images of the flare of 24 October 1991 in the Al12 filter of the SXT. Overlaid are contours of the WL emission (solid lines) and of the M1 channel (dashed lines). |
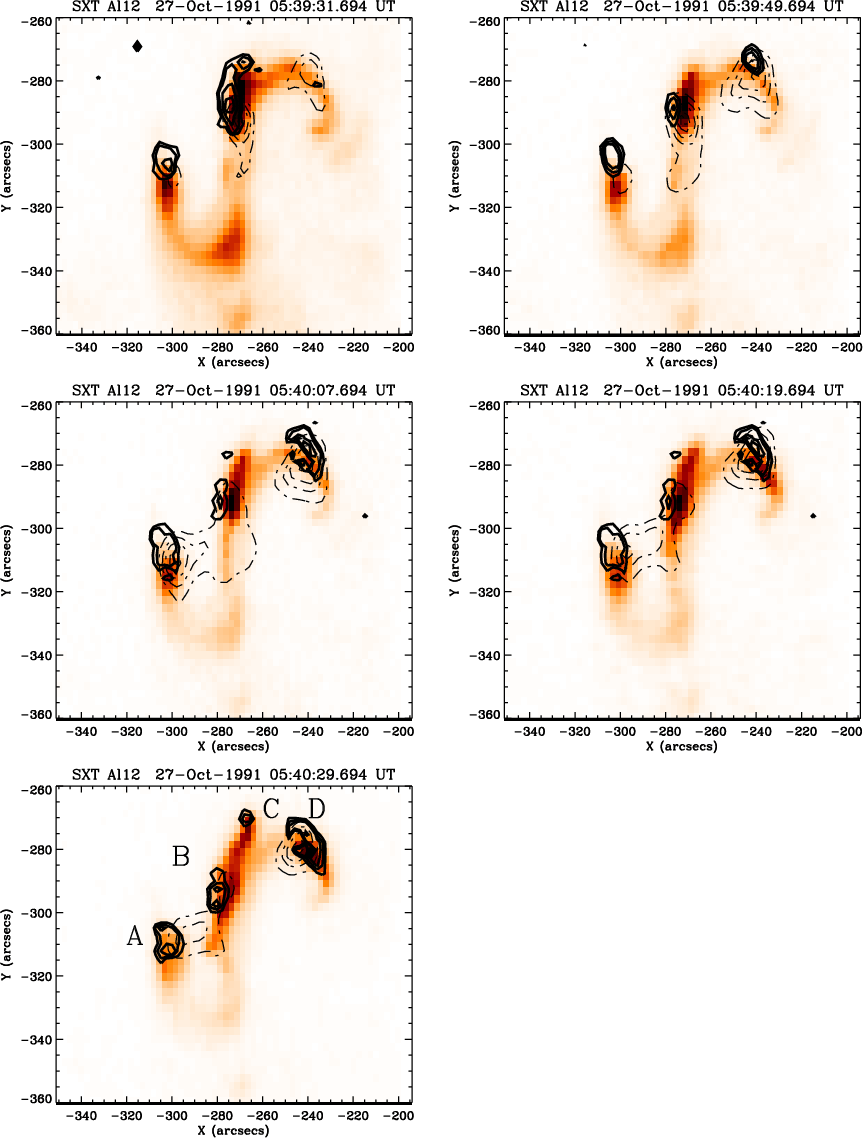 |
Figure B.6: A series of images of the flare of 27 October 1991 in the Al12 filter of the SXT. Overlaid are contours of the WL emission (solid lines) and of the M1 channel (dashed lines). |
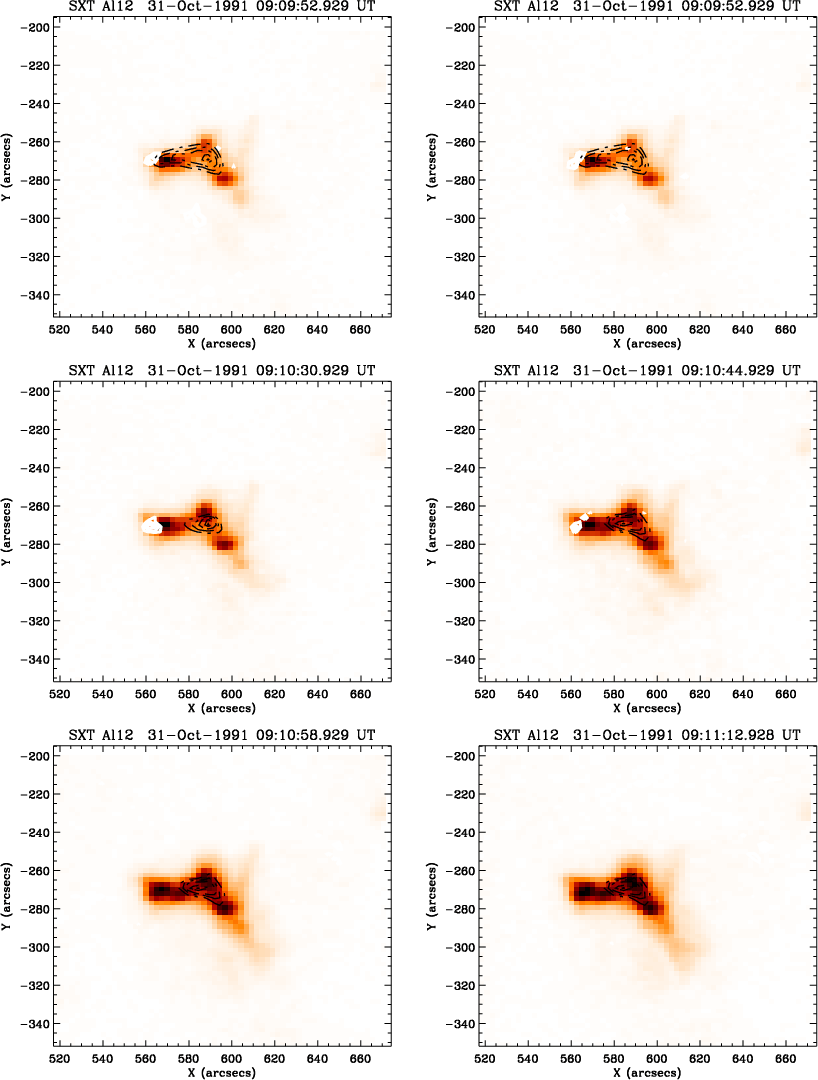 |
Figure C.2: A series of images of the flare of 31 October 1991 in the Al12 filter of the SXT. Overlaid are contours of the WL emission (solid lines) and of the M1 channel (dashed lines). |
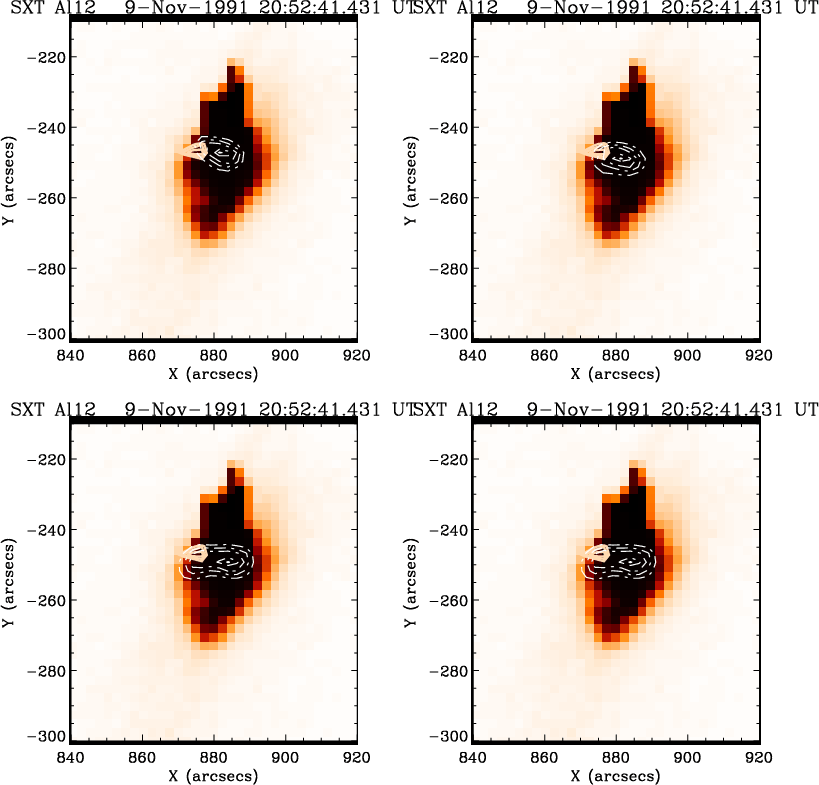 |
Figure D.2: A series of images of the flare of 9 November 1991 in the Al12 filter of the SXT. Overlaid are contours of the WL emission (solid lines) and of the M1 channel (dashed lines). |
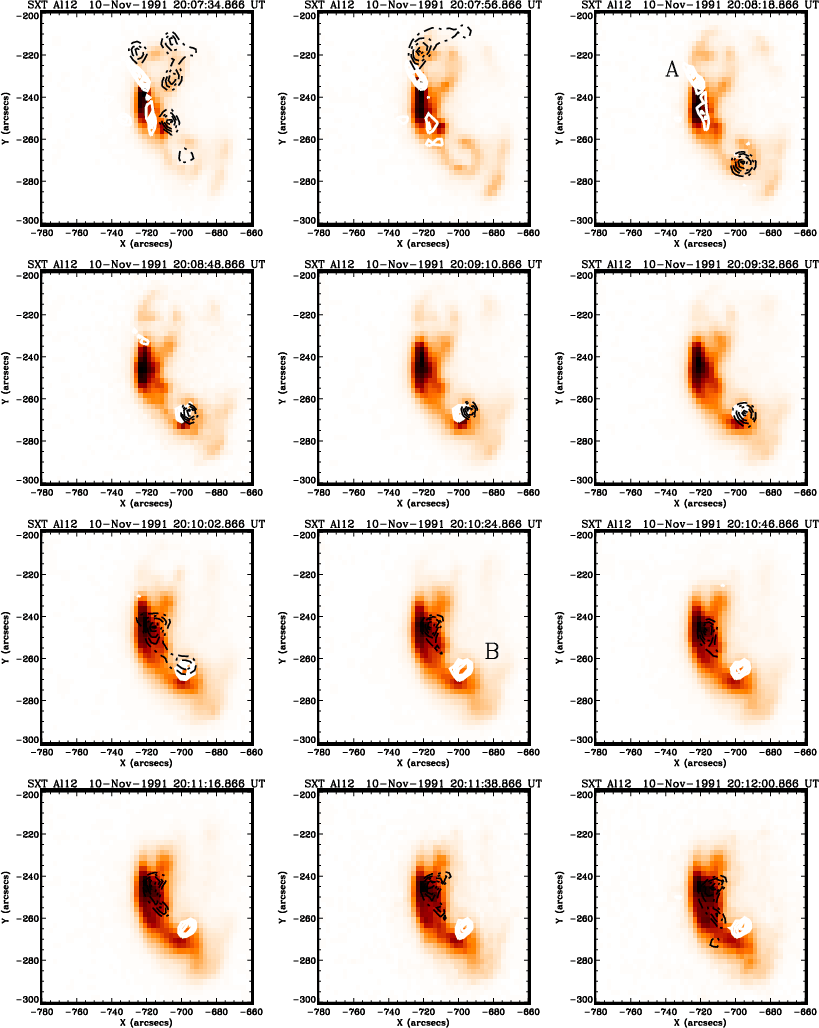 |
Figure E.4: A series of images of the flare of 10 November 1991 in the Al12 filter of the SXT. Overlaid are contours of the WL emission (solid lines) and of the M1 channel (dashed lines). |
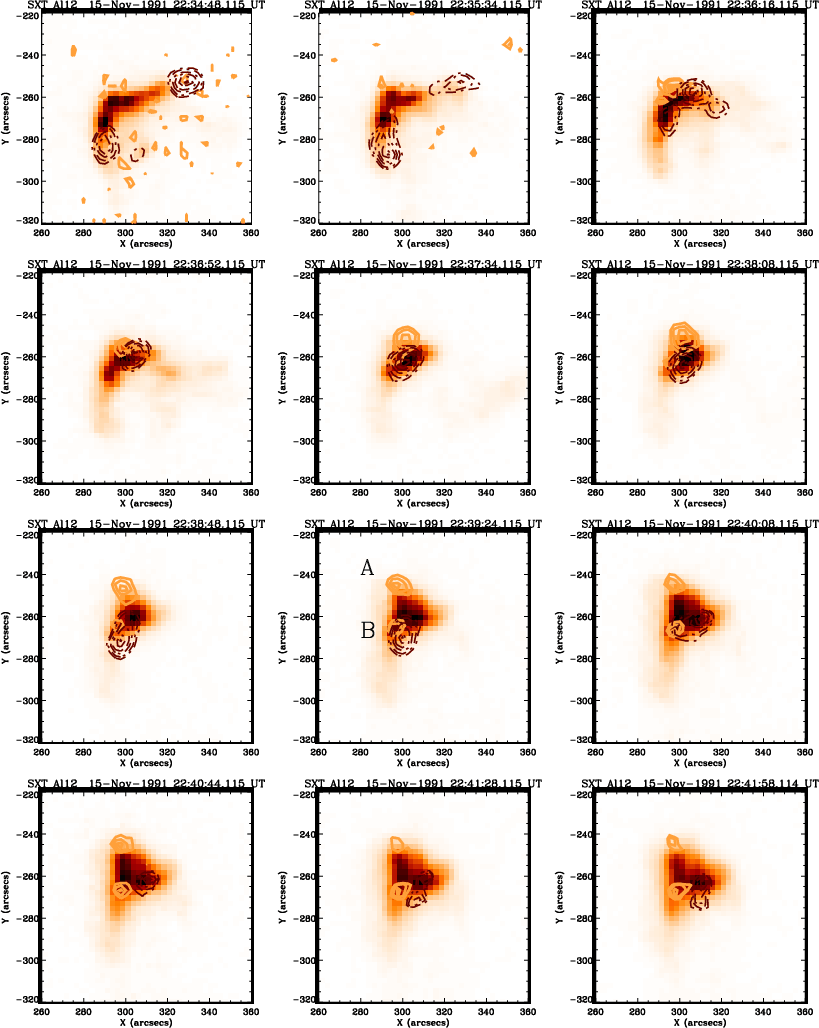 |
Figure F.4: A series of images of the flare of 15 November 1991 in the Al12 filter of the SXT. Overlaid are contours of the WL emission (solid lines) and of the M1 channel (dashed lines). |
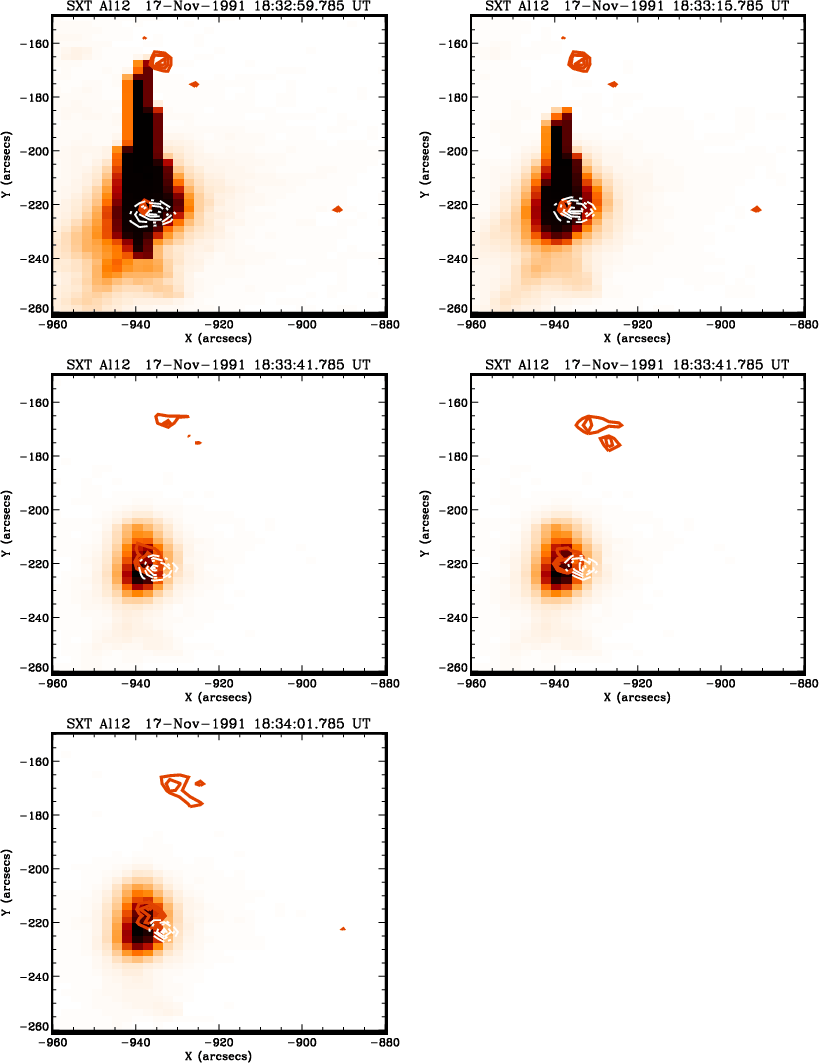 |
Figure G.2: A series of images of the flare of 17 November 1991 in the Al12 filter of the SXT. Overlaid are contours of the WL emission (solid lines) and of the M1 channel (dashed lines). |
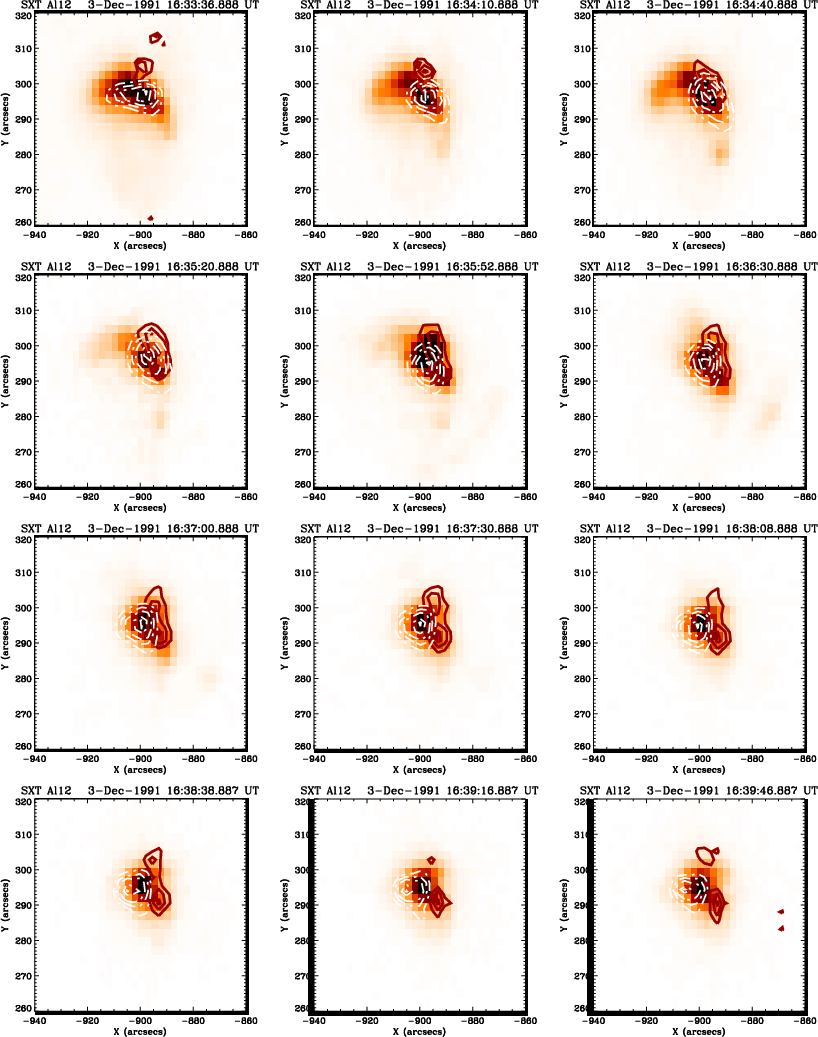 |
Figure H.2: A series of images of the flare of 3 December 1991 in the Al12 filter of the SXT. Overlaid are contours of the WL emission (solid lines) and of the M1 channel (dashed lines). |
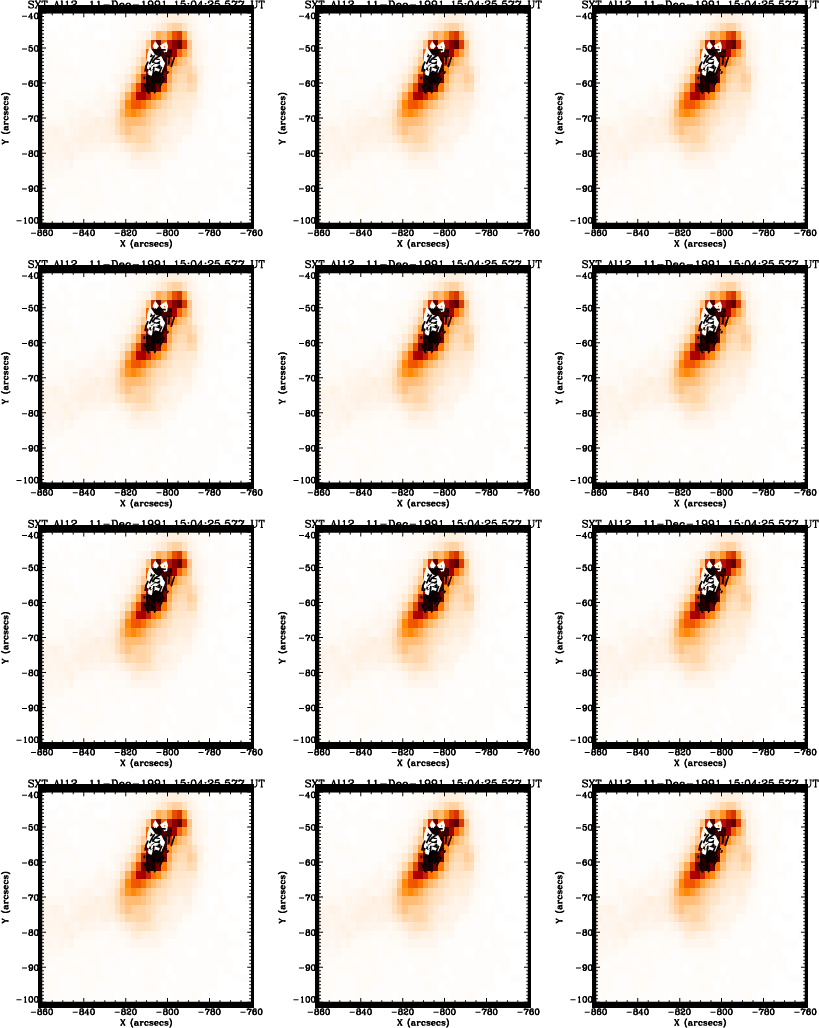 |
Figure I.2: A series of images of the flare of 11 December 1991 in the Al12 filter of the SXT. Overlaid are contours of the WL emission (solid lines) and of the M1 channel (dashed lines). |
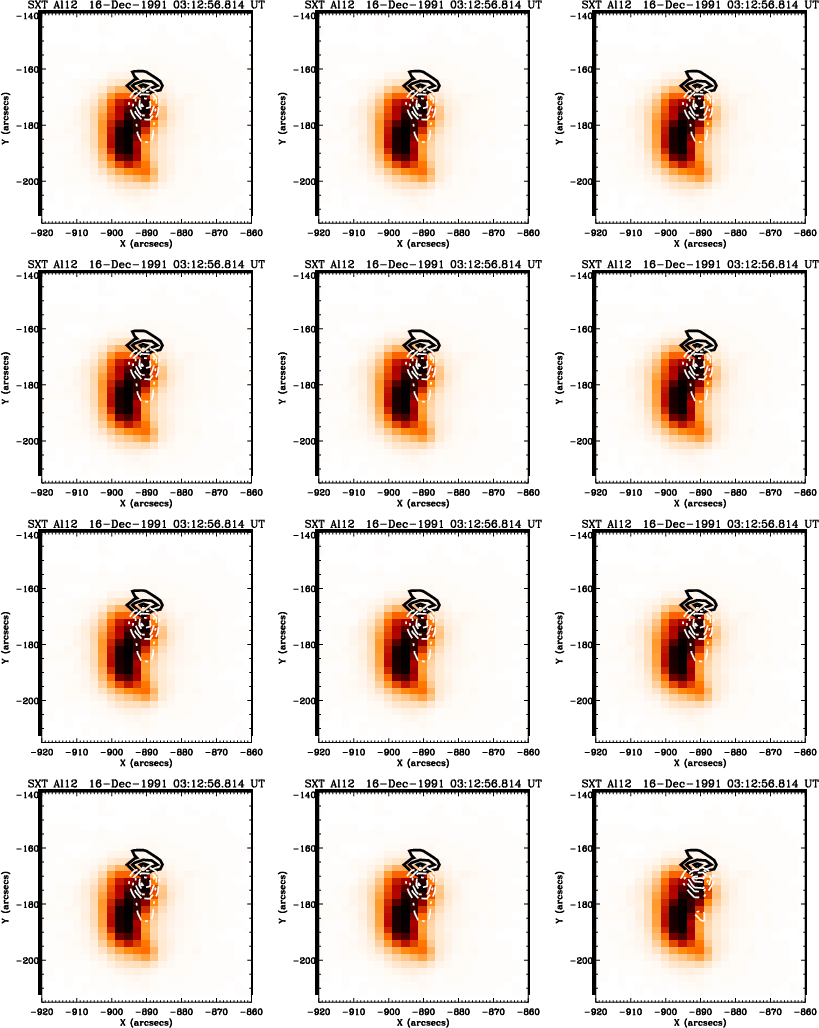 |
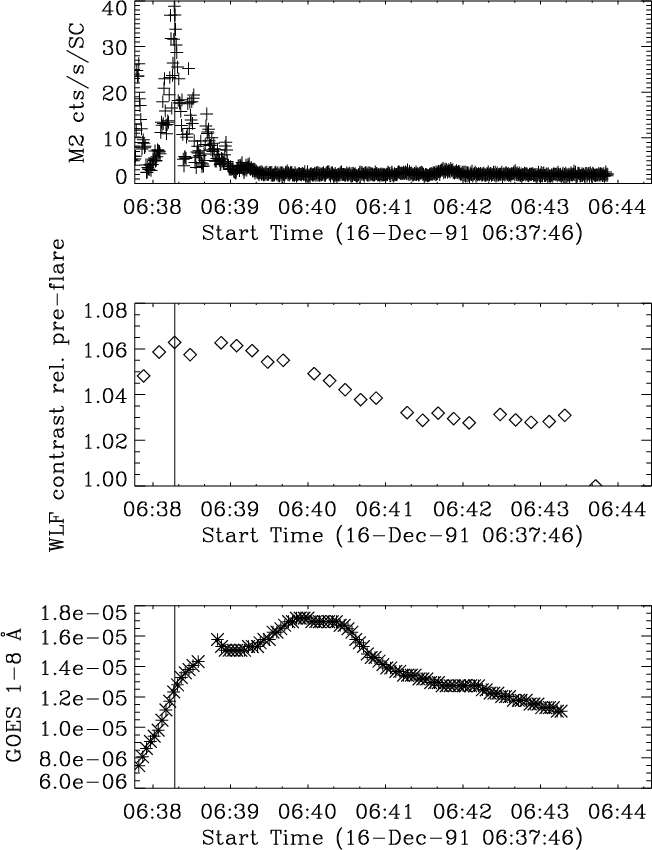
Figure J.2: A series of images of the 1st flare on 16 December 1991 in the Al12 filter of the SXT. Overlaid are contours of the WL emission (solid lines) and of the M1 channel (dashed lines). |
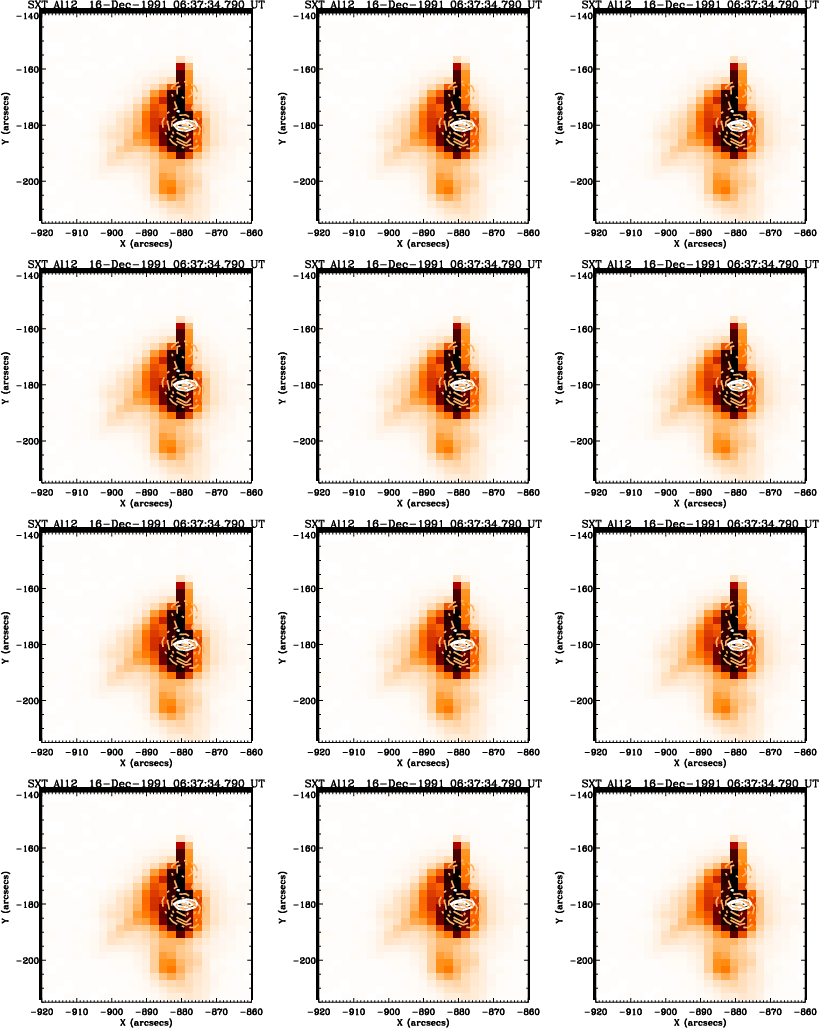 |
Figure K.2: A series of images of the flare of 16 December 1991 in the Al12 filter of the SXT. Overlaid are contours of the WL emission (solid lines) and of the M1 channel (dashed lines). |
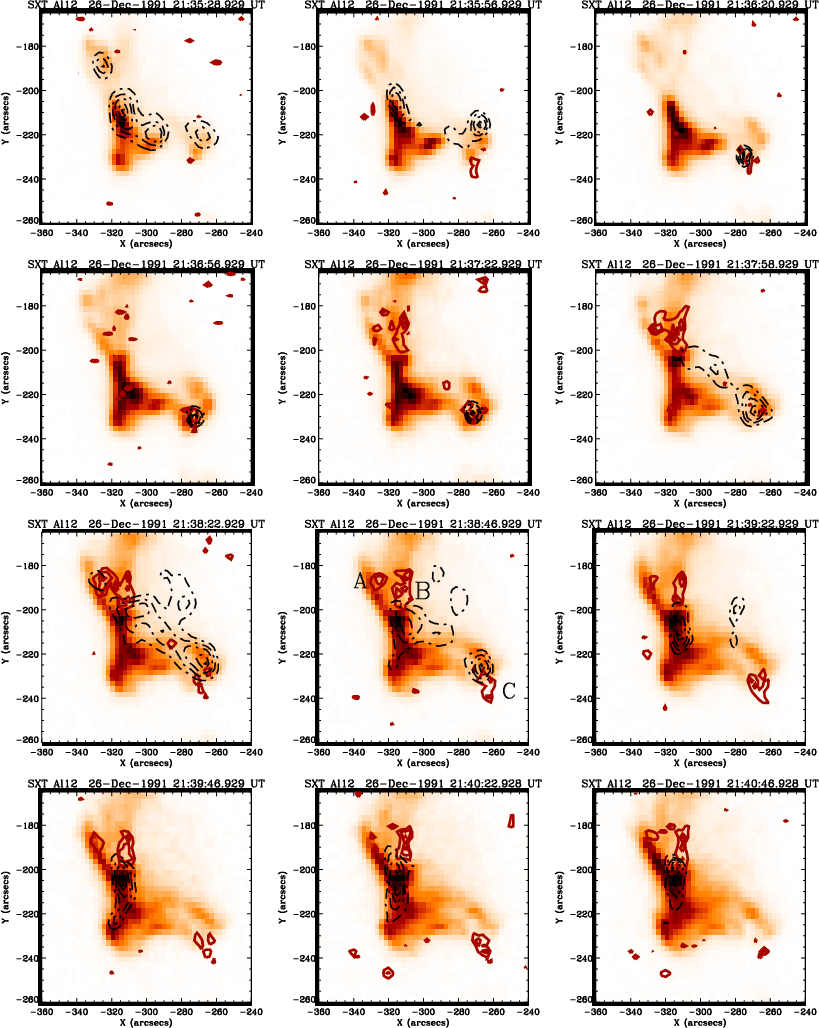 |
Figure L.5: A series of images of the flare of 26 December 1991 in the Al12 filter of the SXT. Overlaid are contours of the WL emission (solid lines) and of the M1 channel (dashed lines). |
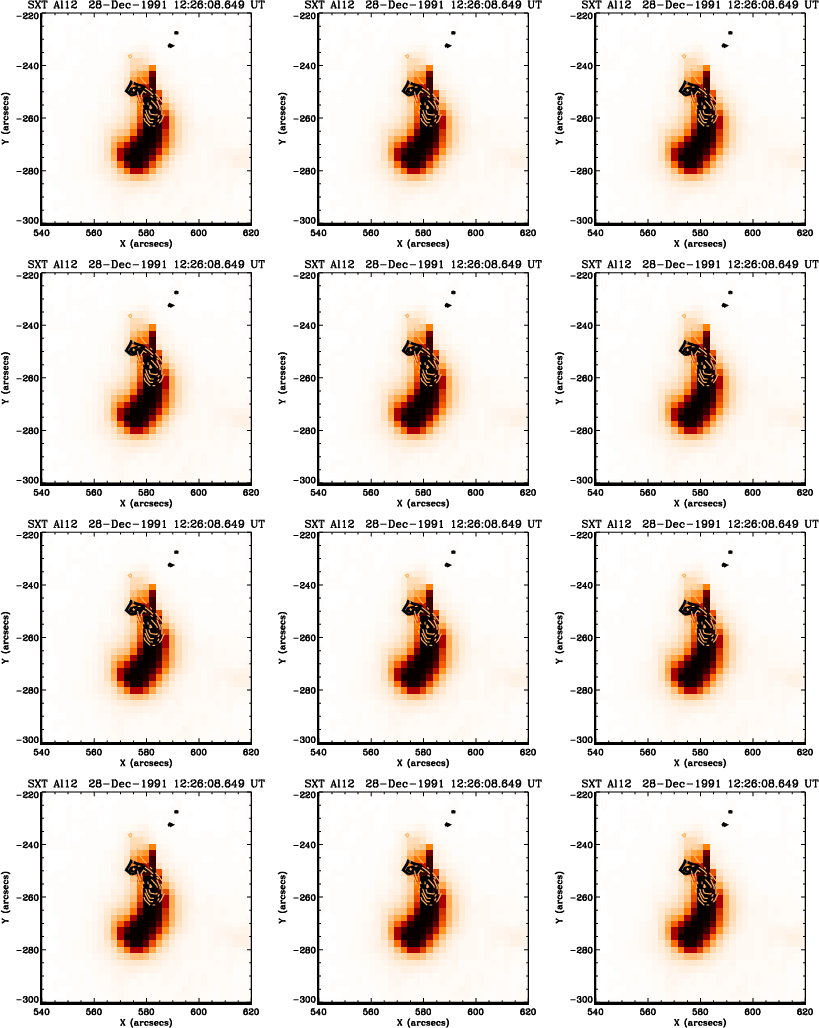 |
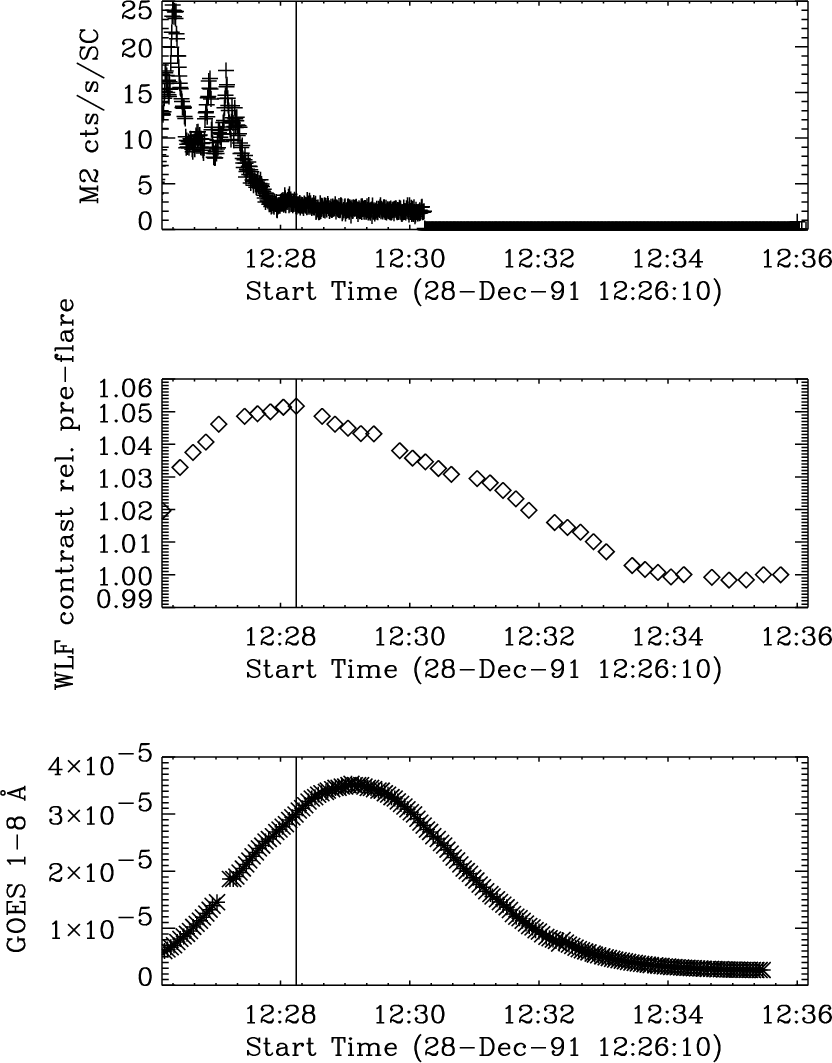
Figure M.2: A series of images of the flare of 28 December 1991 in the Al12 filter of the SXT. Overlaid are contours of the WL emission (solid lines) and of the M1 channel (dashed lines). |
![\begin{figure}\par\resizebox{16cm}{!}{\includegraphics[width=16cm]{4109on.f46.ps}}\end{figure}](/articles/aa/full/2003/39/aa4109/img113.gif) |
Figure N.7: A series of images of the flare of 26 January 1992 in the Al12 filter of the SXT. Overlaid are contours of the WL emission (solid lines) and of the M1 channel (dashed lines). |
 |
Figure O.2: A series of images of the flare of 30 January 1992 in the Al12 filter of the SXT. Overlaid are contours of the WL emission (solid lines) and of the M1 channel (dashed lines). |
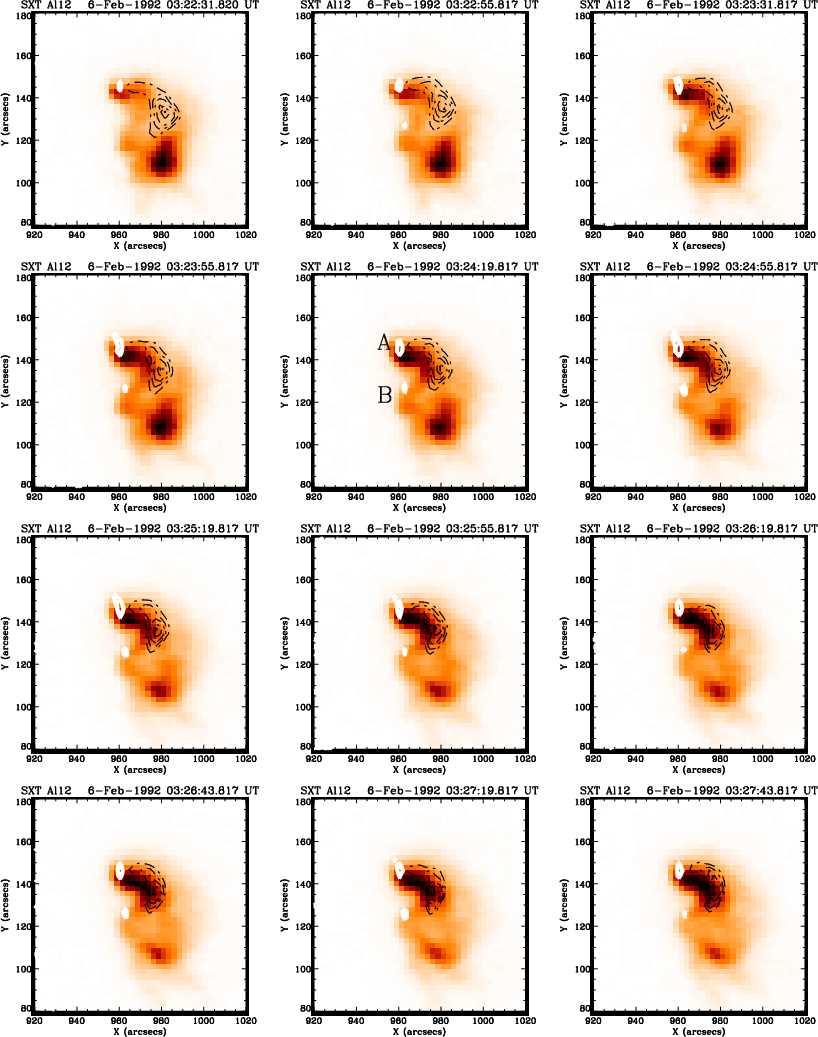 |
Figure P.4: A series of images of the flare of 6 February 1992 in the Al12 filter of the SXT. Overlaid are contours of the WL emission (solid lines) and of the M1 channel (dashed lines). |
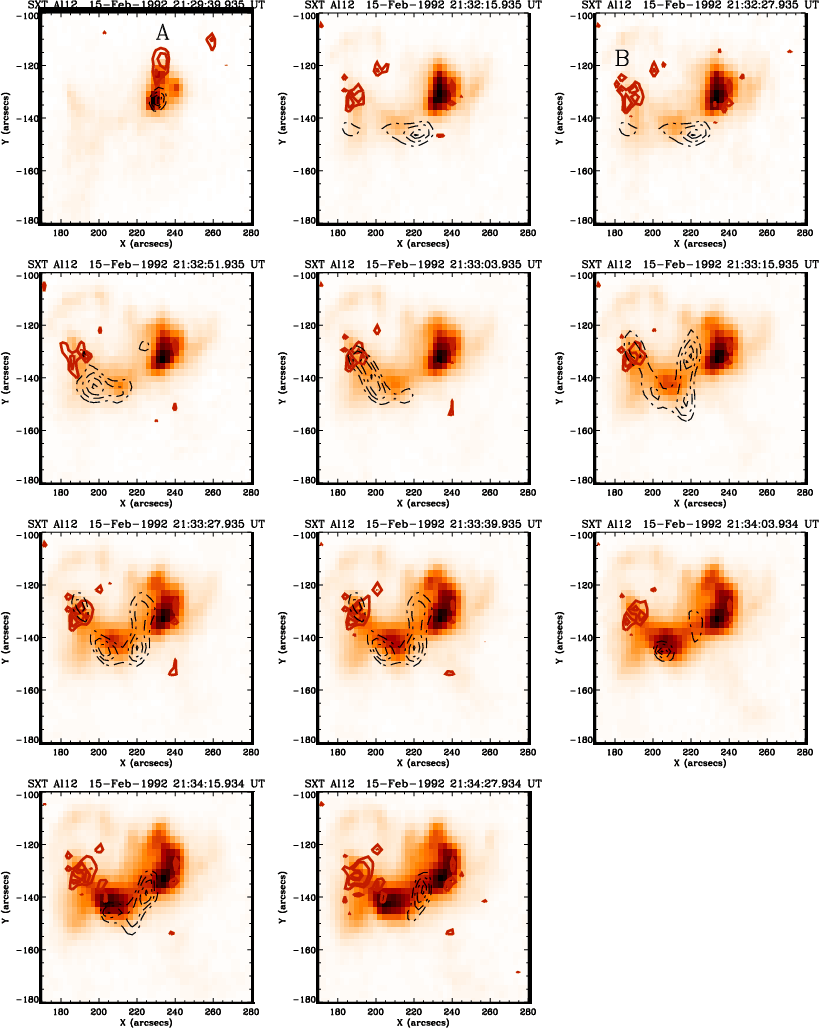 |
Figure Q.4: A series of images of the flare of 15 February 1992 in the Al12 filter of the SXT. Overlaid are contours of the WL emission (solid lines) and of the M1 channel (dashed lines). |
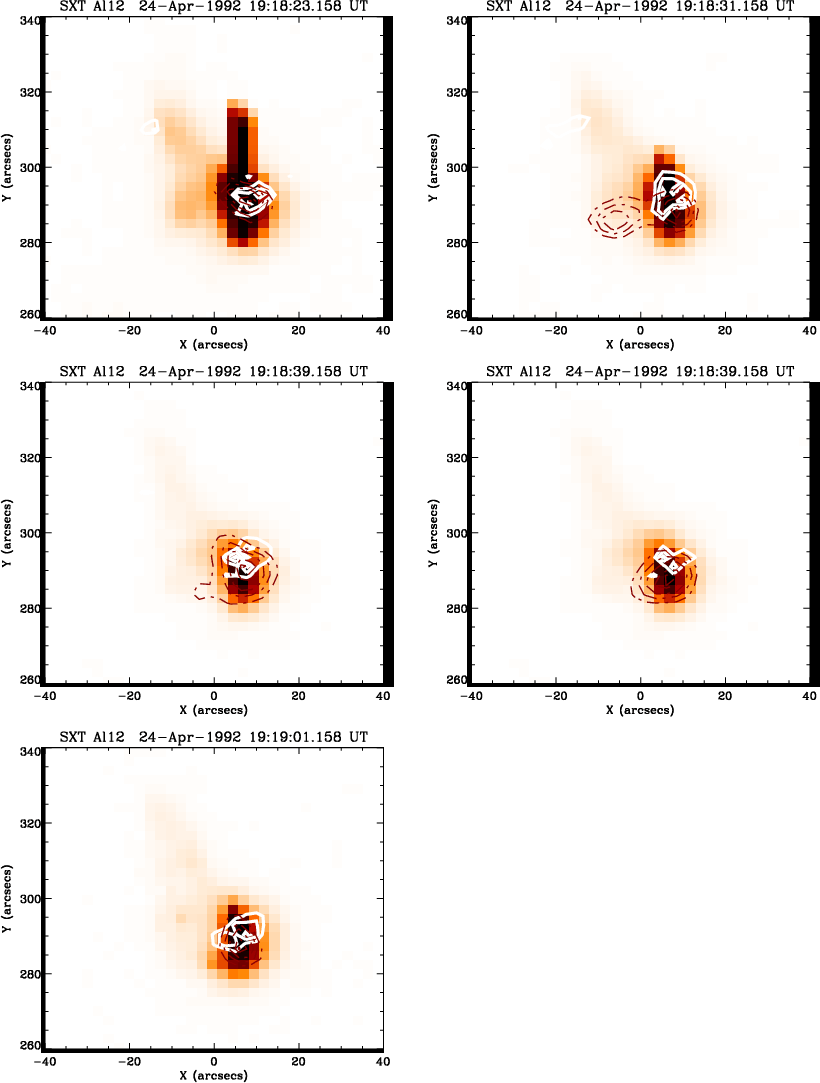 |
Figure R.2: A series of images of the flare of 24 April 1992 in the Al12 filter of the SXT. Overlaid are contours of the WL emission (solid lines) and of the M1 channel (dashed lines). |
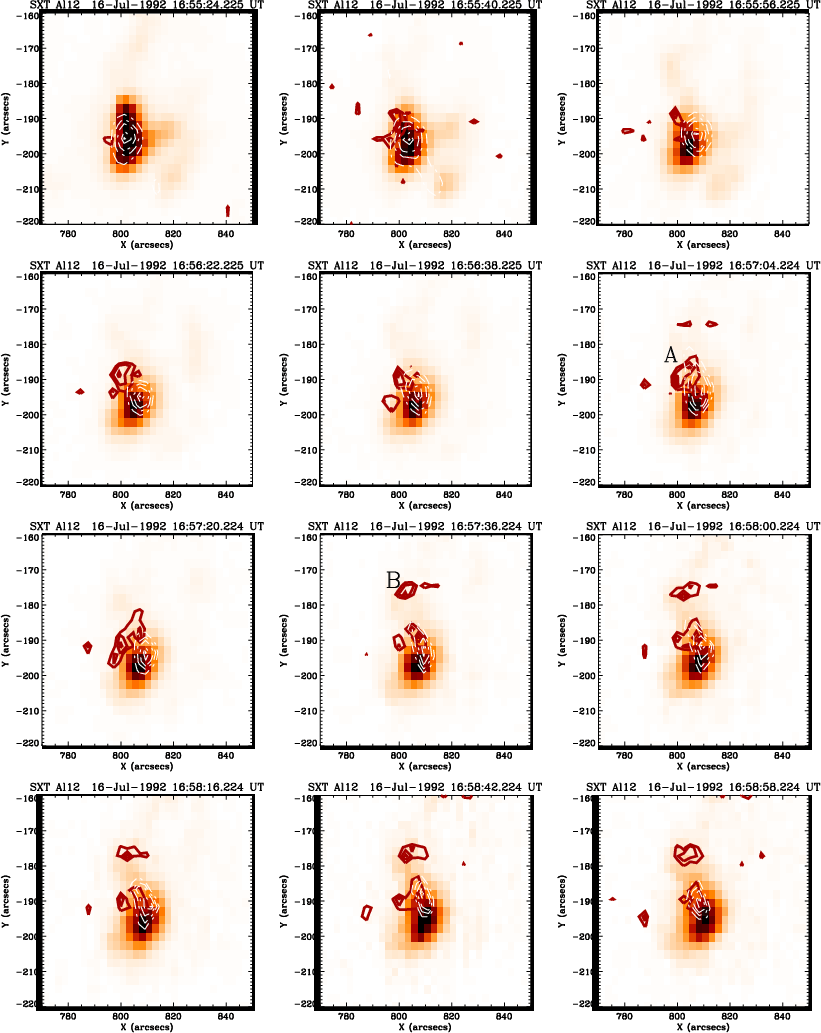 |
Figure S.4: A series of images of the flare of 16 July 1992 in the Al12 filter of the SXT. Overlaid are contours of the WL emission (solid lines) and of the M1 channel (dashed lines). |
 |
Figure T.2: A series of images of the flare of 11 August 1992 in the Al12 filter of the SXT. Overlaid are contours of the WL emission (solid lines) and of the M1 channel (dashed lines). |
 |
Figure U.2: A series of images of the flare of 20 August 1992 in the Al12 filter of the SXT. Overlaid are contours of the WL emission (solid lines) and of the M1 channel (dashed lines). |
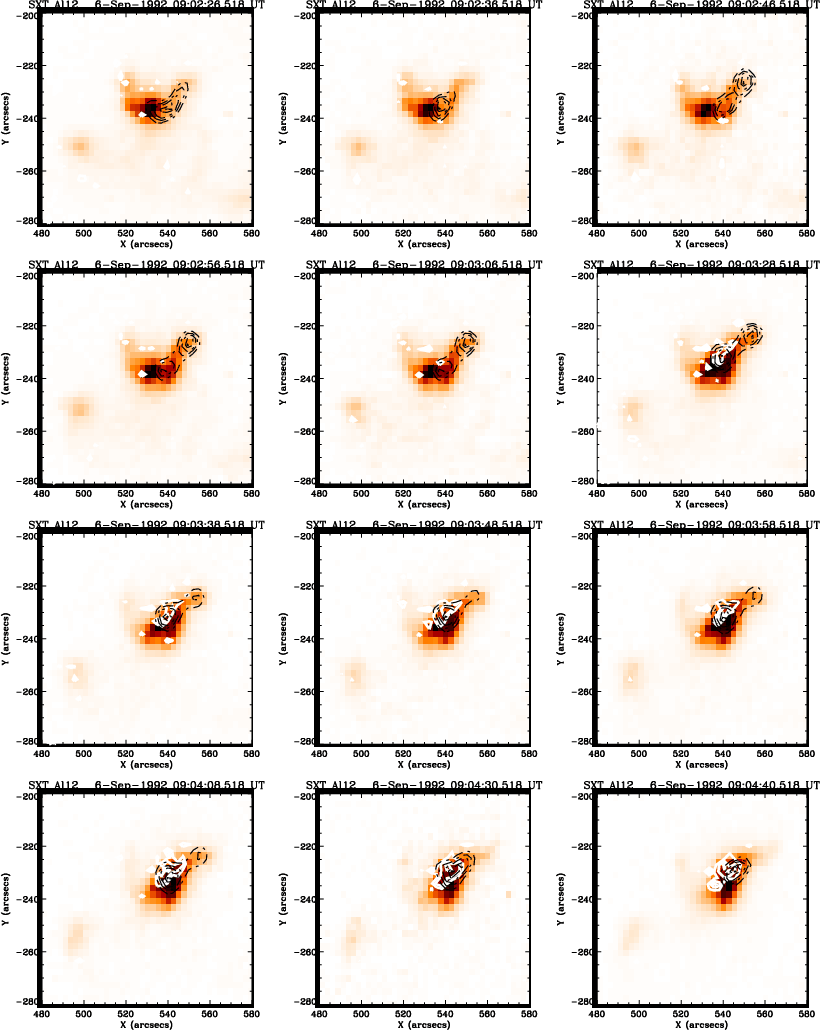 |
Figure V.2: A series of images of the flare of 6 September 1992 in the Al12 filter of the SXT. Overlaid are contours of the WL emission (solid lines) and of the M1 channel (dashed lines). |
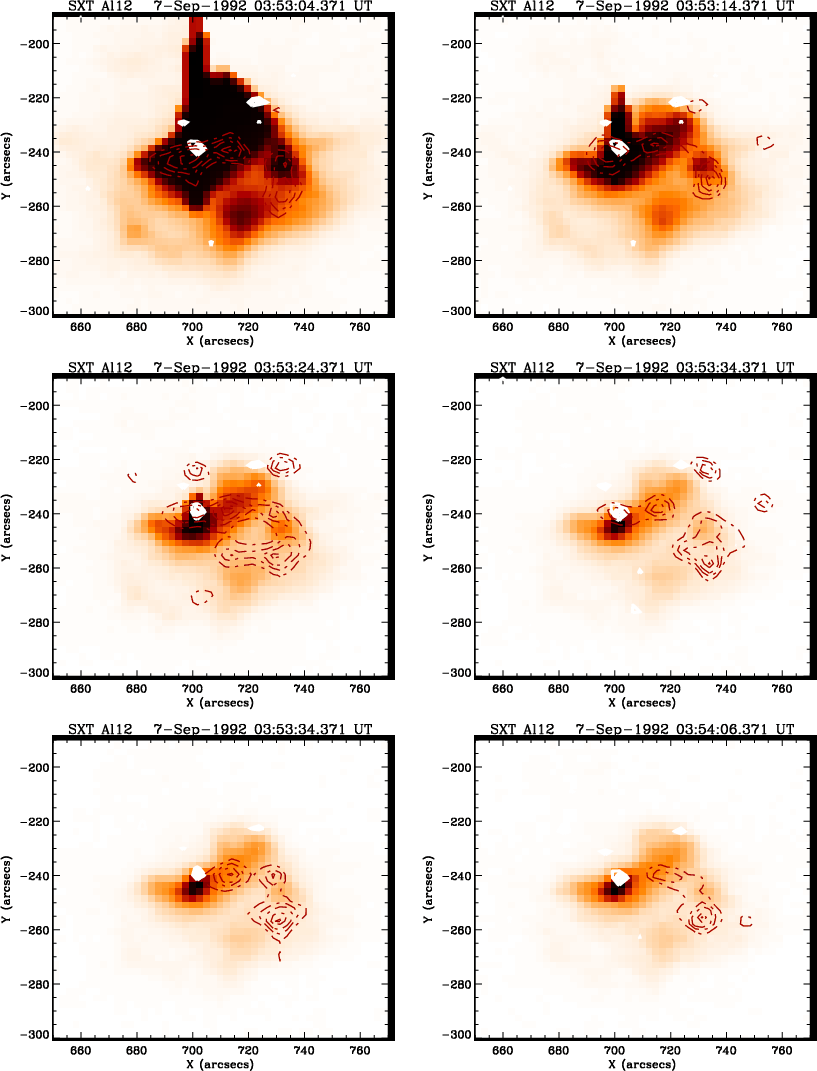 |
Figure W.2: A series of images of the flare of 7 September 1992 in the Al12 filter of the SXT. Overlaid are contours of the WL emission (solid lines) and of the M1 channel (dashed lines). |
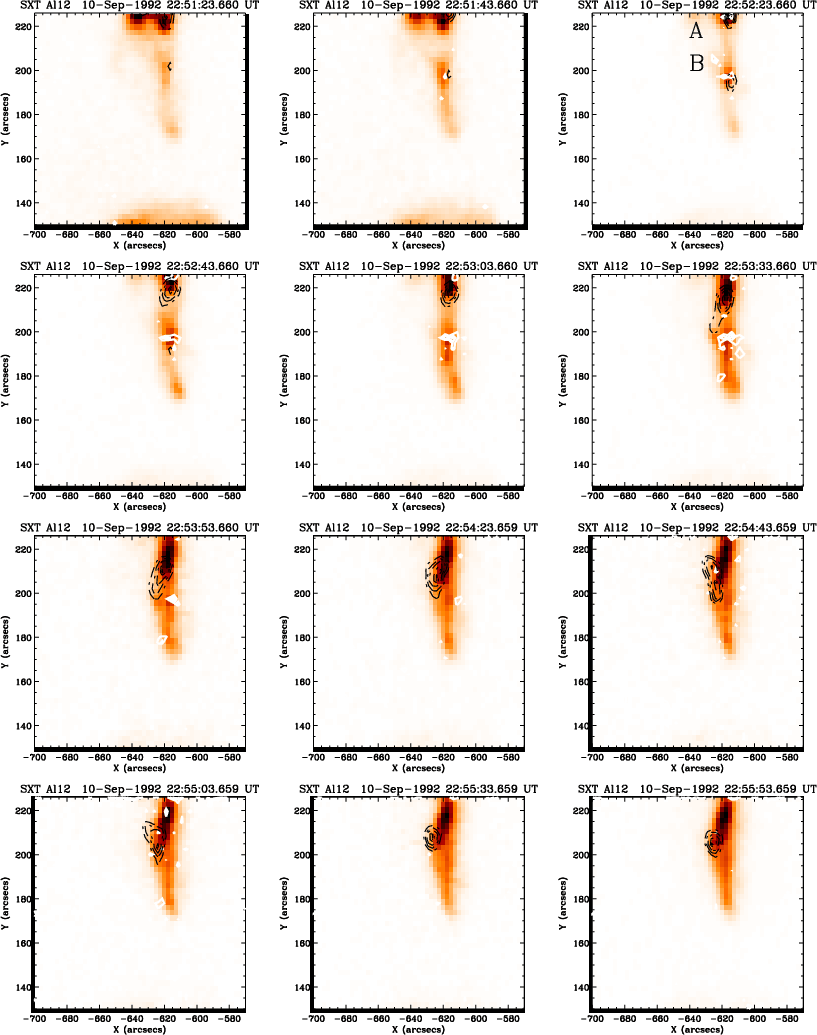 |
Figure X.4: A series of images of the flare of 10 September 1992 in the Al12 filter of the SXT. Overlaid are contours of the WL emission (solid lines) and of the M1 channel (dashed lines). |
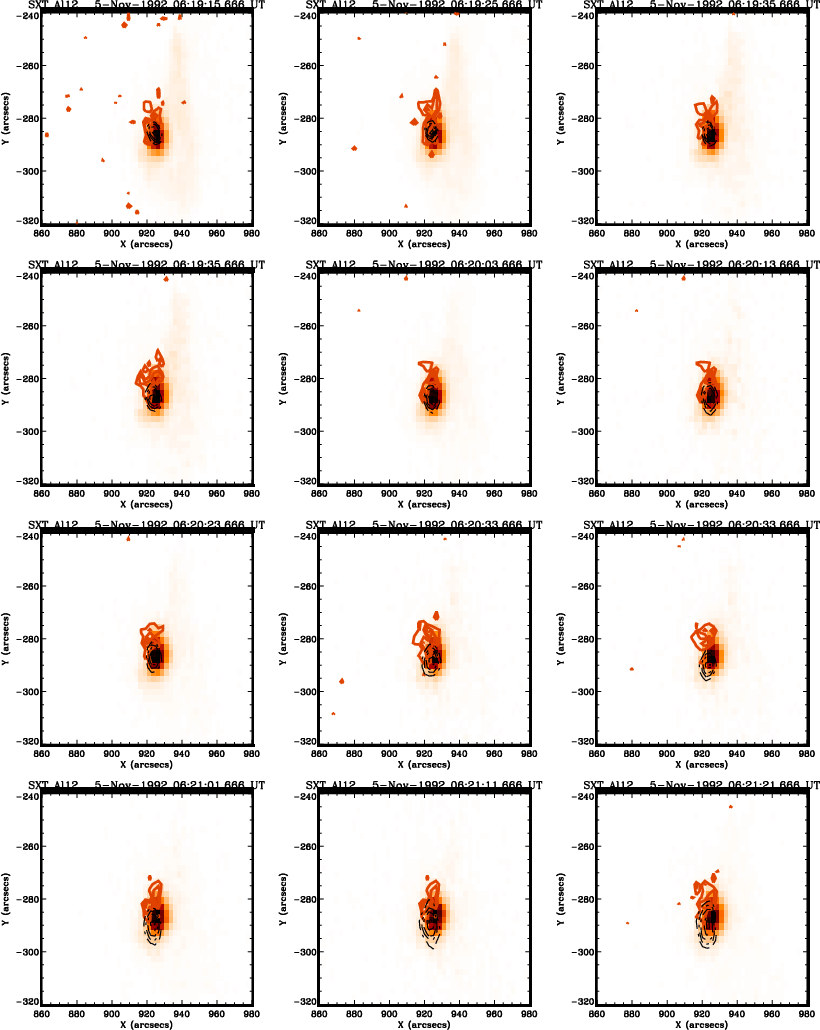 |
Figure Y.2: A series of images of the flare of 5 November 1992 in the Al12 filter of the SXT. Overlaid are contours of the WL emission (solid lines) and of the M1 channel (dashed lines). |
![\begin{figure}
\par\includegraphics[width=8.8cm]{4109on.f1.ps} \end{figure}](/articles/aa/full/2003/39/aa4109/img68.gif)
![\begin{figure}
\par\includegraphics[width=8.8cm]{4109on.f2.ps} %
\end{figure}](/articles/aa/full/2003/39/aa4109/img69.gif)
![\begin{figure}
\par\includegraphics[width=8.8cm]{4109on.f3.ps} \def \@captype{figure}\end{figure}](/articles/aa/full/2003/39/aa4109/img70.gif)
![\begin{figure}
\includegraphics[width=8.5cm]{4109on.f5.ps} \end{figure}](/articles/aa/full/2003/39/aa4109/img72.gif)
![\begin{figure}
\par\includegraphics[width=8.5cm]{4109on.f6.ps} \end{figure}](/articles/aa/full/2003/39/aa4109/img73.gif)
![\begin{figure}
\par\includegraphics[width=7.5cm]{4109on.f7.ps} \end{figure}](/articles/aa/full/2003/39/aa4109/img74.gif)
![\begin{figure}
\par\includegraphics[width=7.5cm]{4109on.f8.ps}\end{figure}](/articles/aa/full/2003/39/aa4109/img75.gif)
![\begin{figure}
\par\includegraphics[width=7.5cm]{4109on.f9.ps}\def \@captype{figure}\end{figure}](/articles/aa/full/2003/39/aa4109/img76.gif)
![\begin{figure}
\includegraphics[width=14cm,clip]{4109on.f13.ps}\end{figure}](/articles/aa/full/2003/39/aa4109/img80.gif)
![\begin{figure}
\par\includegraphics[width=8cm]{4109on.f15.ps}\end{figure}](/articles/aa/full/2003/39/aa4109/img82.gif)
![\begin{figure}\includegraphics[width=8cm]{4109on.f16.ps}\end{figure}](/articles/aa/full/2003/39/aa4109/img83.gif)
![\begin{figure}\includegraphics[width=8cm]{4109on.f17.ps}\end{figure}](/articles/aa/full/2003/39/aa4109/img84.gif)
![\begin{figure}\par\includegraphics[width=8cm]{4109on.f19.ps}\end{figure}](/articles/aa/full/2003/39/aa4109/img86.gif)
![\begin{figure}\includegraphics[width=8cm]{4109on.f20.ps}\end{figure}](/articles/aa/full/2003/39/aa4109/img87.gif)
![\begin{figure}\includegraphics[width=8cm]{4109on.f21.ps}\end{figure}](/articles/aa/full/2003/39/aa4109/img88.gif)
![\begin{figure}\par\includegraphics[width=8cm]{4109on.f33.ps}\end{figure}](/articles/aa/full/2003/39/aa4109/img100.gif)
![\begin{figure}\includegraphics[width=8cm]{4109on.f34.ps}\end{figure}](/articles/aa/full/2003/39/aa4109/img101.gif)
![\begin{figure}\includegraphics[width=8cm]{4109on.f35.ps}\end{figure}](/articles/aa/full/2003/39/aa4109/img102.gif)
![\begin{figure}\par\includegraphics[width=8cm]{4109on.f36.ps}\end{figure}](/articles/aa/full/2003/39/aa4109/img103.gif)
![\begin{figure}\par\includegraphics[width=8cm]{4109on.f40.ps}\end{figure}](/articles/aa/full/2003/39/aa4109/img107.gif)
![\begin{figure}\par\includegraphics[width=8cm]{4109on.f41.ps}\end{figure}](/articles/aa/full/2003/39/aa4109/img108.gif)
![\begin{figure}\includegraphics[width=8.5cm]{4109on.f42.ps}\end{figure}](/articles/aa/full/2003/39/aa4109/img109.gif)
![\begin{figure}\includegraphics[width=8.5cm]{4109on.f43.ps}\end{figure}](/articles/aa/full/2003/39/aa4109/img110.gif)
![\begin{figure}\includegraphics[width=8cm]{4109on.f44.ps}\def \@captype{figure}\end{figure}](/articles/aa/full/2003/39/aa4109/img111.gif)
![\begin{figure}\includegraphics[width=8cm]{4109on.f45.ps}\def \@captype{figure}\end{figure}](/articles/aa/full/2003/39/aa4109/img112.gif)
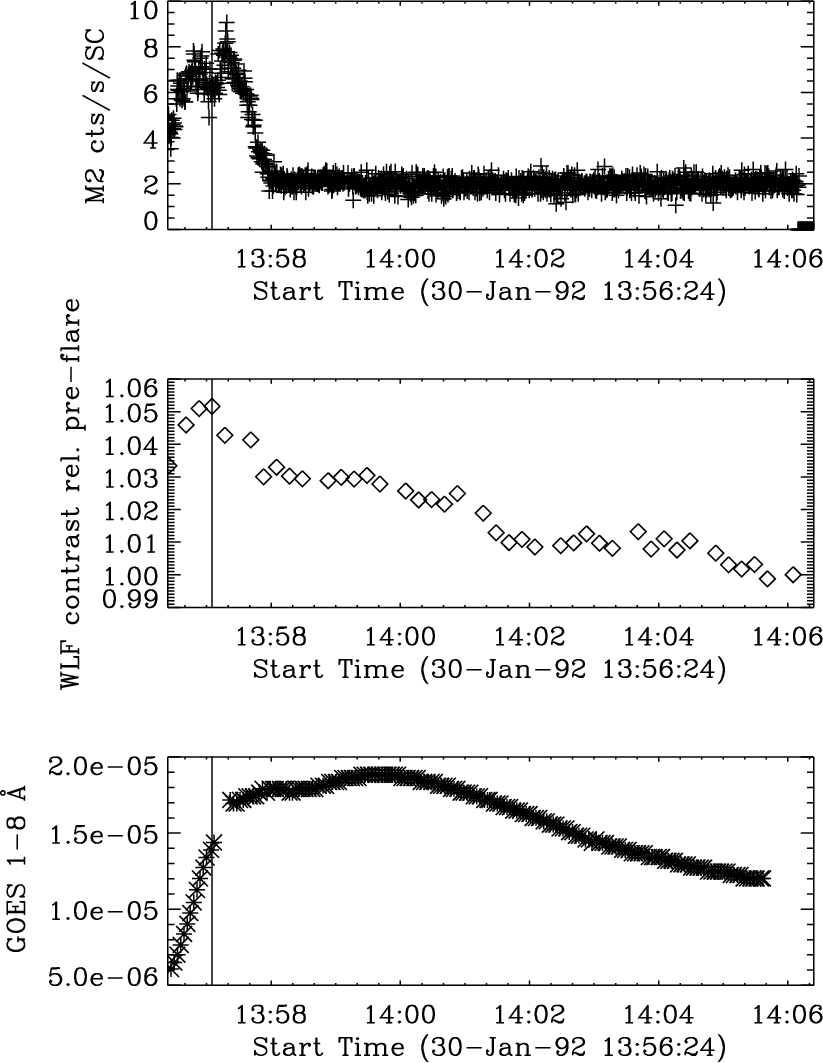
![\begin{figure}\par\includegraphics[width=8cm]{4109on.f49.ps}\end{figure}](/articles/aa/full/2003/39/aa4109/img116.gif)
![\begin{figure}\includegraphics[width=8cm]{4109on.f50.ps}\end{figure}](/articles/aa/full/2003/39/aa4109/img117.gif)
![\begin{figure}\includegraphics[width=8cm]{4109on.f51.ps}\end{figure}](/articles/aa/full/2003/39/aa4109/img118.gif)
![\begin{figure}\par\includegraphics[width=8cm]{4109on.f53.ps}\end{figure}](/articles/aa/full/2003/39/aa4109/img120.gif)
![\begin{figure}\includegraphics[width=8cm]{4109on.f54.ps}\end{figure}](/articles/aa/full/2003/39/aa4109/img121.gif)
![\begin{figure}\includegraphics[width=8cm]{4109on.f55.ps}\end{figure}](/articles/aa/full/2003/39/aa4109/img122.gif)
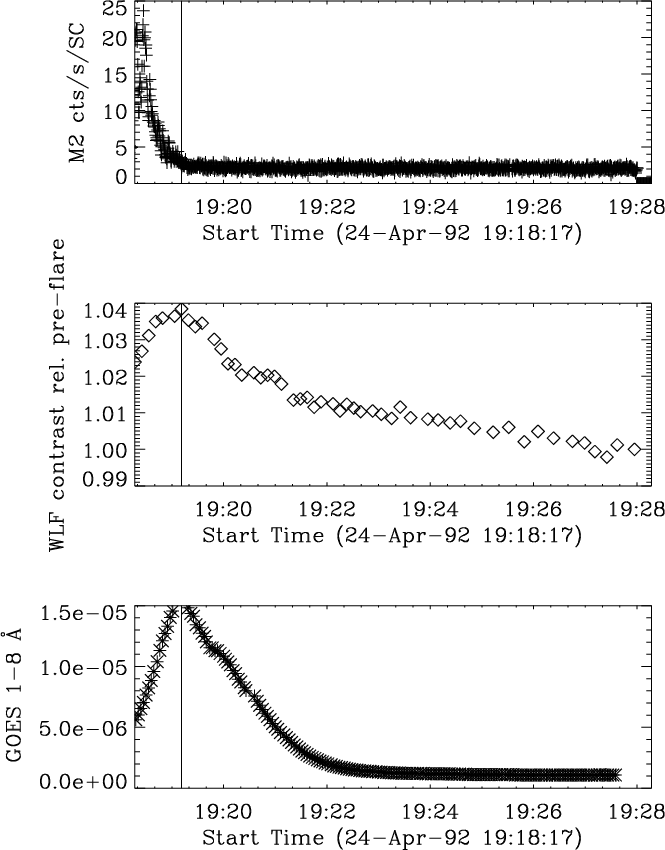
![\begin{figure}\par\includegraphics[width=8cm]{4109on.f59.ps}\end{figure}](/articles/aa/full/2003/39/aa4109/img126.gif)
![\begin{figure}\includegraphics[width=8cm]{4109on.f60.ps}\end{figure}](/articles/aa/full/2003/39/aa4109/img127.gif)
![\begin{figure}\includegraphics[width=8cm]{4109on.f61.ps}\end{figure}](/articles/aa/full/2003/39/aa4109/img128.gif)
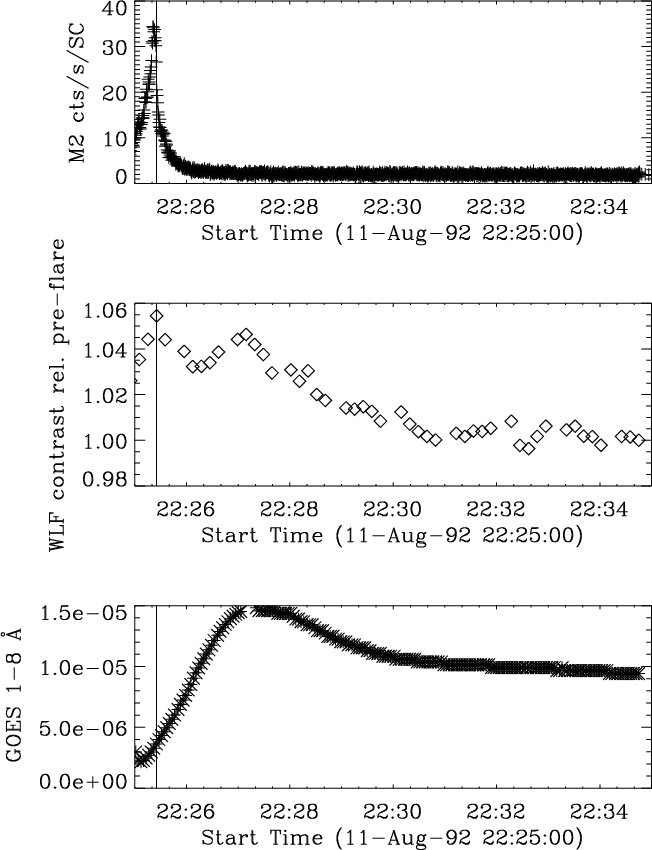
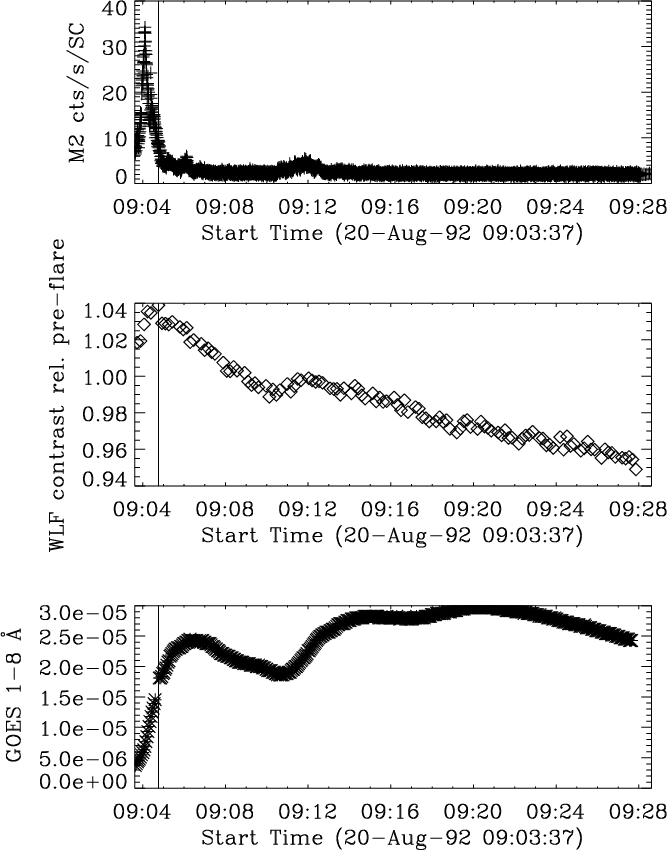
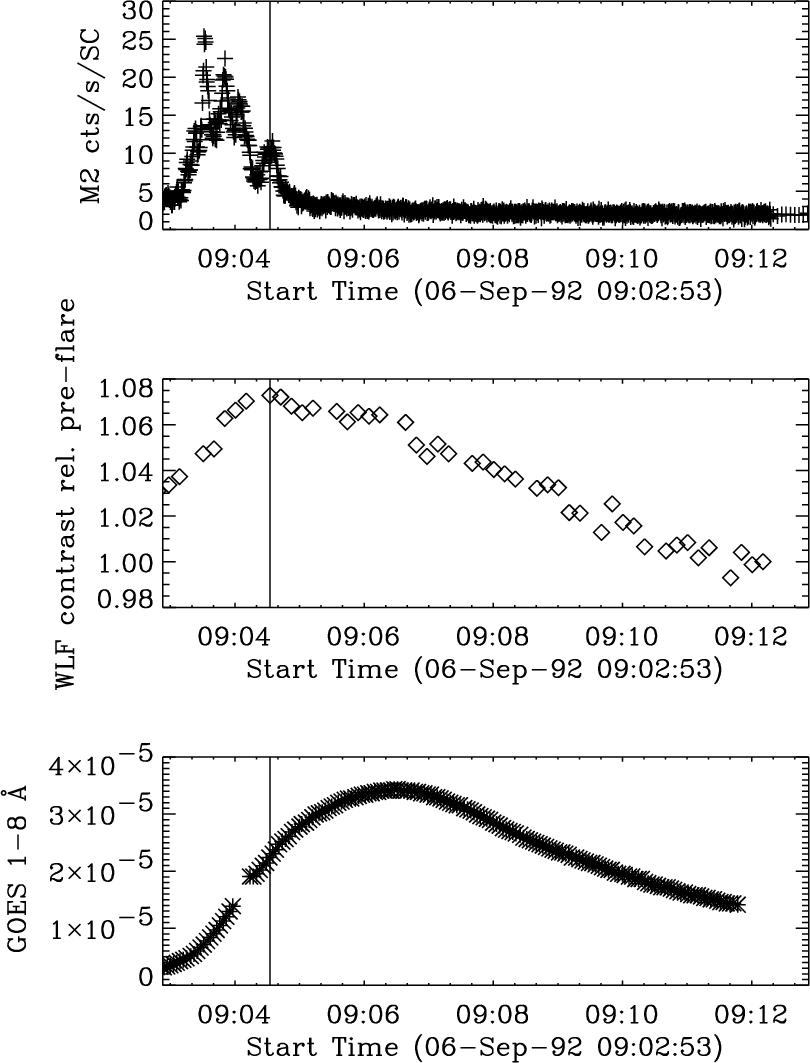
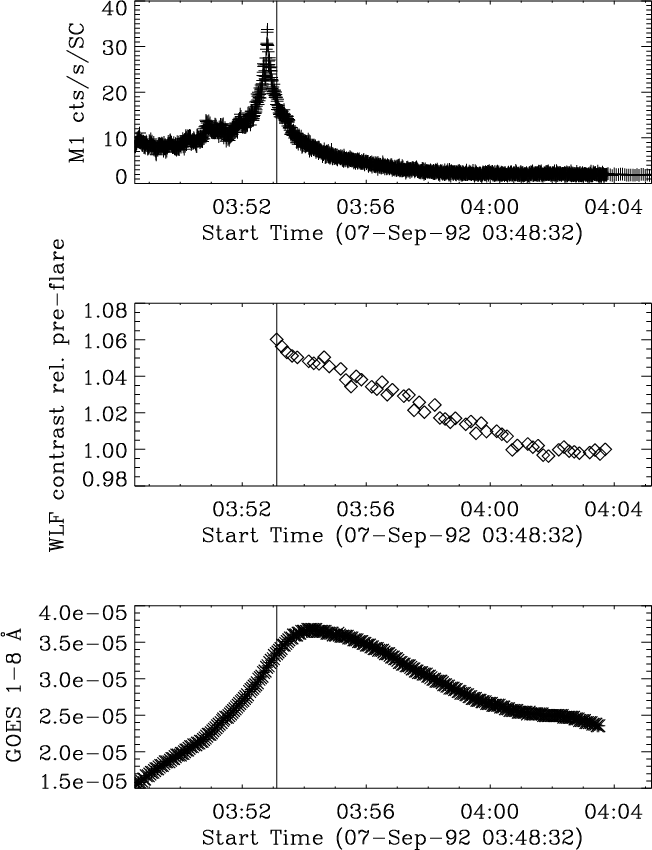
![\begin{figure}\par\includegraphics[width=8cm]{4109on.f71.ps}\end{figure}](/articles/aa/full/2003/39/aa4109/img138.gif)
![\begin{figure}\includegraphics[width=8cm]{4109on.f72.ps}\end{figure}](/articles/aa/full/2003/39/aa4109/img139.gif)
![\begin{figure}\includegraphics[width=8cm]{4109on.f73.ps}\end{figure}](/articles/aa/full/2003/39/aa4109/img140.gif)